16+ Gorgeous Winter Ombre Nails That’ll Keep You Cozy and Chic

Winter is officially here, and honestly, there’s nothing quite like having nails that match the cozy, magical vibe of the season.
But here’s the thing – finding the perfect winter nail look can feel overwhelming. You want something beautiful but not too complicated, festive but still wearable every day, right?
That’s exactly why winter ombre nails are having such a moment right now. They’re elegant, surprisingly easy to create, and they capture that gorgeous frosty feeling without being too literal about it.
I don’t know about you, but I love nails that feel seasonal without screaming “LOOK AT MY WINTER NAILS!” at everyone. Ombre nail designs give you that perfect balance of subtle and stunning.
Whether you’re into soft neutrals, icy blues, or sparkly silvers, there’s an ombre manicure here that’ll make you feel absolutely fabulous all winter long.
If you love winter vibes but want something more wearable, you’ll also love these neutral holiday nails that look festive without feeling too loud.
Let’s dive into 16+ beautiful designs that’ll inspire your next trip to the nail salon (or your own DIY session at home!).
Why Ombre is Perfect for Winter

You might be wondering what makes ombre such a great choice for the colder months. Let me tell you!
First off, the gradient effect naturally reminds us of winter scenes. Think about how snow fades into the horizon, how frost gradually covers windows, or how the winter sky transitions from light to dark. Winter ombre nails capture all those beautiful natural gradients.
What I love most about ombre nails is how forgiving they are. Unlike nail art that requires perfect precision, ombre is supposed to look blended and soft. Even if your technique isn’t perfect, it still looks intentional and pretty.
If you like that clean, polished vibe, you can also check these French tips nail designs—they give the same classy feel with less blending.
Plus, ombre works with literally any color palette. You can go full winter wonderland with whites and silvers, embrace cozy vibes with warm neutrals, or make a statement with deep jewel tones. The versatility is unmatched.
The gradient effect also makes your nails look longer and more elegant, which is always a bonus. The way colors fade from dark to light (or vice versa) creates this optical illusion that’s super flattering.
Finding Your Perfect Winter Ombre Style
Not all ombre nails are created equal, and choosing the right style makes such a difference. Let me break down what works best for different situations.
| Ombre Style | Best For | Perfect When |
|---|---|---|
| Nude to White | Work, everyday wear | You want subtle elegance |
| Blue to White | Casual outings, weekends | You want obvious winter vibes |
| Silver Glitter Fade | Parties, celebrations | You want maximum sparkle |
| Dark to Light Gray | Edgy looks, modern style | You want sophistication |
| Pastel Gradient | Feminine looks | You want soft, pretty nails |
Your nail length matters too, by the way. Short nails look absolutely gorgeous with subtle fades like nude-to-white or soft pink gradients. These keep things clean and modern without overwhelming your nail bed.
Longer nails give you more space to play with dramatic transitions. Think icy blue fading to white, silver glitter ombre, or even multi-color gradients that really show off that length.
In my experience, the best approach is thinking about your lifestyle. If you’re constantly in meetings or professional settings, stick with neutral ombre shades. But if you’ve got more flexibility, go bold with those winter colors!
16+ Beautiful Winter Ombre Nail Ideas
1. Classic Nude to White Fade

This is the ultimate sophisticated winter ombre that goes with everything. Start with a soft nude or peachy-pink at the cuticles and fade into pure white tips for a clean, snow-kissed look. It works for work, parties, and everyday wear, and it instantly makes fingers look longer. Keep the blend smooth (no harsh lines) and it’ll look expensive even if it’s simple.
If you want more looks like this, these neutral holiday nails are full of elegant, winter-friendly shades.
2. Icy Blue Winter Gradient

Start with sky/baby blue at the base and fade to white tips for an icy, fresh winter vibe. It gives “ice princess” energy without looking costume-y, and it looks amazing on almond or coffin nails. You can leave it plain or add a light shimmer on top for extra sparkle. Bonus: it photographs beautifully in winter lighting.
3. Silver Glitter Ombre

Go from a clear/nude base to fully silver-glitter tips for maximum glam. It’s perfect for holidays and New Year’s because the glitter catches light like crazy and hides wear really well. Use fine glitter for subtle shine or chunky glitter for drama, and seal it with top coat for a smooth finish. Instant “fancy hands” effect.
For more sparkle-heavy sets, take a look at these Christmas glitter nails.
4. Soft Pink to White Gradient

Fade blush or rose pink into white tips for a soft, romantic winter ombre. It’s subtle enough for daily wear but still looks intentional and polished. Works great for winter weddings, date nights, or whenever you want something lighter than the usual dark winter shades. Keep it simple or add tiny accents if you want.
5. Deep Navy to Light Blue Ombre

Start with deep navy at the base and fade to light blue at the tips for a moody, winter-night kind of look. It’s different from the usual pastel fades but still totally wearable and classy. Add silver shimmer for dimension or go matte for a modern vibe. Looks especially stunning on longer nails.
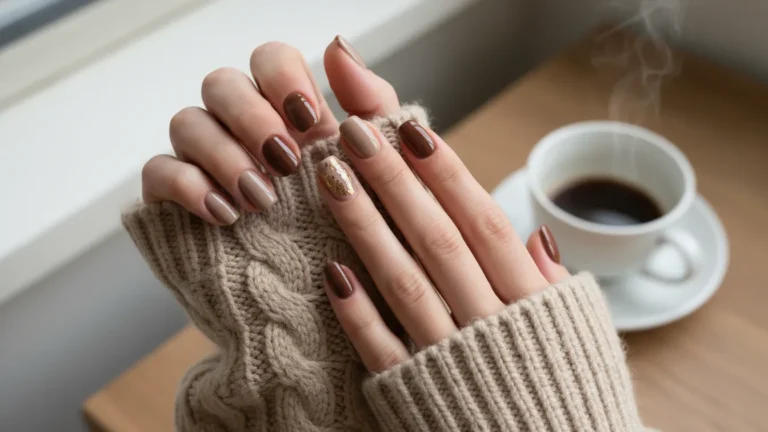
6. Champagne to Gold Shimmer
Begin with champagne/beige and fade into warm gold shimmer tips for a luxurious holiday-ready gradient. It feels cozy and rich, not loud, and pairs perfectly with gold jewelry. The shimmer gives that “glow” without going full glitter. Great for parties, dinners, and winter events.
7. White to Gray Gradient

A clean white-to-soft-gray ombre is minimalist, chic, and very “winter sky.” It’s simple but looks high-fashion, and it goes with literally every outfit. Looks especially pretty on shorter nails, and you can choose glossy or matte depending on your vibe. Understated but still interesting.
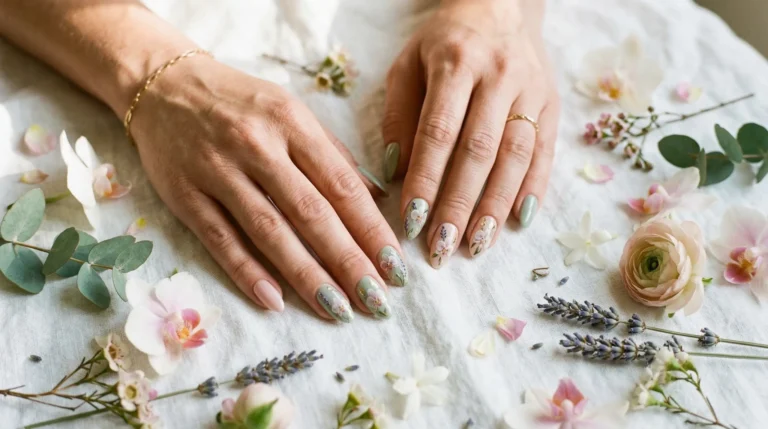
8. Lavender to White Ombre

Fade soft lavender into white tips for a dreamy, slightly magical winter look. It’s unique without being loud, and the white keeps it seasonal and fresh. You can add tiny accents, but it also looks gorgeous on its own. Super pretty in photos.
If soft + feminine is your thing, you’ll love these pink Christmas nails too.
9. Rose Gold Chrome Ombre

Apply rose gold chrome heavier at the tips and fade it toward a nude base for a luxe, mirror-like effect. It looks high-end and influencer-level, perfect for parties and formal events. You can do all nails for impact or keep it to accents. Rose gold also matches both silver and gold jewelry.
10. Mint Green to White Fade

Start with pale mint/seafoam at the base and fade into white tips for a fresh, unexpected winter ombre. It stands out from the usual blues while still feeling cool-toned and seasonal. Looks amazing on short nails and photographs well in any lighting. Add pearls/rhinestones if you want a dressed-up version.
11. Black to Silver Glitter Ombre

Go from deep black at the base to silver glitter tips for an edgy, glam winter statement. The contrast is bold, dramatic, and perfect for night events or New Year’s. Black makes fingers look longer, and silver glitter brings the sparkle. Fine shimmer = classy, chunky glitter = extra.
If you want something easier but still stylish, these simple Christmas nail design ideas are a great backup.
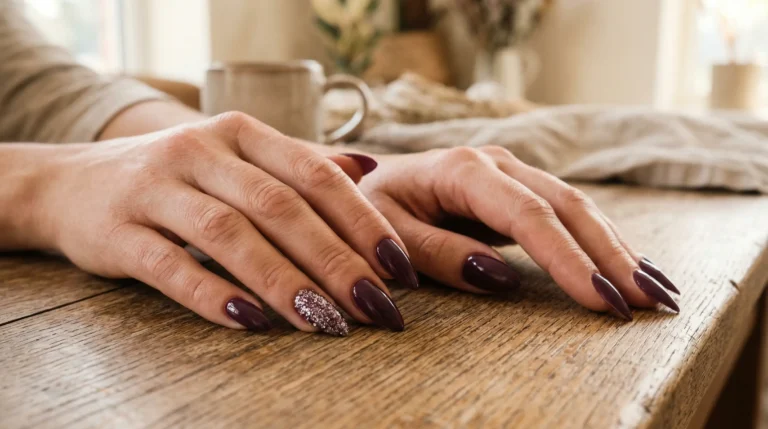
12. Burgundy to Nude Gradient

Fade deep burgundy into a soft nude tip for a rich, cozy winter look that still feels elegant. It’s festive without being too “holiday-themed,” and it pairs beautifully with winter outfits. Add gold accents if you want glam, or keep it clean and salon-chic. Super flattering on all skin tones.
13. Holographic Ombre

Keep holographic strongest at the tips and fade it softly toward the base for an iridescent, color-shifting finish. It changes in every light, so it looks different in every photo—so fun for parties. It’s trendy, futuristic, and still wearable because it works with any outfit. Total conversation-starter.
14. Peachy Pink to Gold Shimmer
Fade peach/salmon pink into warm gold shimmer tips for a cozy, candlelight kind of gradient. It’s perfect if you don’t love icy winter shades and want something warmer. The gold adds festive sparkle without being too loud. Works from late fall through Valentine’s season easily.
15. Teal to White Winter Fade

Start with rich teal/turquoise at the base and fade into white tips for a bold but winter-appropriate look. It has that ocean-meets-ice vibe that feels modern and fresh. Best on longer nails where the gradient can really show. Add silver accents if you want extra pop.
16. Soft Gray to White Ombre

A gentle gray base fading into white tips is subtle, clean, and very elegant. It’s professional-friendly but still looks styled and intentional. Works best on short nails, and both glossy or matte finishes look amazing. Basically: effortless winter chic.
17. Purple to Pink Gradient

Start with deep plum/purple at the base and fade into soft pink tips for a rich, jewel-tone winter gradient. It’s bold but still pretty, with a smooth transition because the colors blend naturally. Add glitter if you want extra glam, or leave it glossy and clean. Perfect for winter celebrations when you want color.
Making Your Winter Ombre Nails Last
You might be wondering how to keep your beautiful ombre manicure looking fresh through all your winter activities. Here’s what actually works.
Start with properly prepped nails. Push back your cuticles gently and buff your nail surface lightly to remove any oils. Clean nails help polish stick better and last way longer. Don’t skip this step even when you’re in a hurry!
Always use a good base coat. This protects your natural nails from staining (especially important with dark colors) and gives your polish something to grip onto. Let it dry completely before starting your ombre.
When creating your ombre, work quickly and blend while the polish is still wet. You can use a makeup sponge for the gradient effect or blend with a brush. The key is smooth transitions without harsh lines.
Seal everything with a quality top coat. This is crucial for ombre nails because it smooths out any texture from the blending process and adds shine. Reapply top coat every two or three days to keep things looking fresh.
Now here’s something important – protect your hands during winter. Cold weather and dry air can make polish chip faster, so wear gloves when you’re outside and keep your cuticles moisturized with oil or cream.
Styling Your Winter Ombre Nails
Your winter ombre nails can totally transform your whole look. Let me share some styling tips that make a difference.
With neutral ombre shades like nude-to-white or gray gradients, you’ve got complete freedom. These work with literally any outfit, which is why they’re such safe, practical choices for everyday wear.
Cool-toned ombre nails (blues, silvers, grays) look especially gorgeous with denim, navy, black, and other cool colors. They also pair beautifully with silver jewelry for a cohesive winter look.
Warm-toned ombre (rose gold, champagne, peachy tones) work wonderfully with earth tones, burgundy, and warm neutrals. Pair these with gold jewelry for maximum impact.
In my experience, matching your nail finish to your outfit vibe makes everything look more put-together. Wearing something sparkly? Go for glitter ombre. Dressed in matte fabrics? Try matte finish nails.
Quick Tips for Different Ombre Techniques
Let me share some tricks that’ll make creating ombre nails way easier.
For the sponge method, use a dense makeup sponge and dab it gently rather than dragging it across your nail. This gives you smoother, more even color transitions without harsh lines.
When using the brush method, work quickly while polish is wet and use light, feathery strokes to blend colors together. Don’t overwork it or the colors will get muddy.
If you’re doing glitter ombre, apply the glitter in thin layers, building up density gradually. This gives you more control over the fade and looks more intentional than just plopping glitter on.
For chrome ombre, start with the chrome at your tips and blend it gradually toward your cuticles using your finger or an applicator. The rubbing motion creates that beautiful fade effect.
Wrapping Up Your Perfect Winter Look
So there you have it – 16+ gorgeous winter ombre nails that prove this technique is perfect for the cozy season.
The thing is, ombre nails are having such a moment right now because they’re beautiful, versatile, and way easier to create than they look. Whether you go subtle or bold, there’s an ombre design here that’ll make you feel fabulous.
Don’t stress about making your gradient look exactly like the inspiration pictures. Part of the beauty of ombre is that it’s supposed to look soft and blended rather than perfect and precise.
What I love most about winter ombre nails is how they capture that magical feeling of the season. They’re festive enough to feel special but wearable enough for every single day.
The cold months should be cozy and beautiful, not stressful. Choose an ombre design that makes you happy and matches your personal style. Your confidence will always look better than perfect nails.
So grab your favorite winter colors, gather your supplies, and get ready to create the prettiest ombre nails this season. Trust me, once you try this technique, you’ll wonder why you didn’t do it sooner!