Vibrant Spring Nail Designs 2025: 25+ Trending Ideas, Expert Techniques & DIY Tutorials
Spring 2025 is rewriting the rules of nail art—and if you’re still thinking florals and pastels are predictable, think again. This season emphasizes simplicity with soft, wearable, and effortlessly chic nails, but that doesn’t mean boring. From butter yellow leading the pastel pack to futuristic chrome finishes and gravity-defying 3D blooms, vibrant spring nail designs have never been more dynamic, accessible, or Instagram-worthy.
Whether you’re a DIY devotee armed with a gel lamp and determination, or a salon regular seeking your next signature look, this comprehensive guide delivers everything you need: trending color palettes, expert-approved techniques, step-by-step tutorials, and 25+ design ideas organized by style and skill level. Let’s transform your fingertips into the ultimate spring accessory.
What Makes Spring 2025 Nail Designs Different
The Quiet Luxury Evolution
Spring’s approach emphasizes healthy nails with personality and durability—balancing clean simplicity with bold experimentation. Unlike the maximalist nail art explosions of previous years, spring 2025 champions:
- Sheer Sophistication: The “it girl” manicure centers on sheer, clean nails—aptly named “soap nails” that prioritize nail health and translucent elegance
- Strategic Chrome: Not the blinding metallics of 2023, but pastel chrome with soft hues like lavender, baby blue, and blush pink featuring high-shine, iridescent finishes
- Jelly Nail Renaissance: Translucent, syrupy hues that feel modern and fresh with a glossy, squishy finish
- Micro Artistry: Tiny fruits, emojis, and delicate florals on chic bases create fresh, fun elevation
Expert Perspective
Celebrity nail artist Erica De Los Santos explains the seasonal shift: The overall vibe focuses on soft, wearable, and effortlessly chic nails—styles that feel polished but not overdone. This philosophy informs every trend below, blending the best of minimalism and self-expression.
Key Characteristics of Vibrant Spring Nail Designs
Color Philosophy: Spring 2025 embraces contradiction—whisper-soft pastels coexist with eye-searing neons. Butter yellow strikes the perfect balance between muted and vibrant, exemplifying the season’s “soft but memorable” aesthetic.
Texture Revolution: Flat polish is officially optional. 3D floral designs add depth and dimension, creating beautiful, multi-layered effects that catch light and start conversations.
Shape Trends: Oval nails are classic and super versatile, working with both minimal and bold designs while being less likely to break compared to stiletto or extreme lengths.
Top 10 Vibrant Spring Nail Color Palettes That Pop
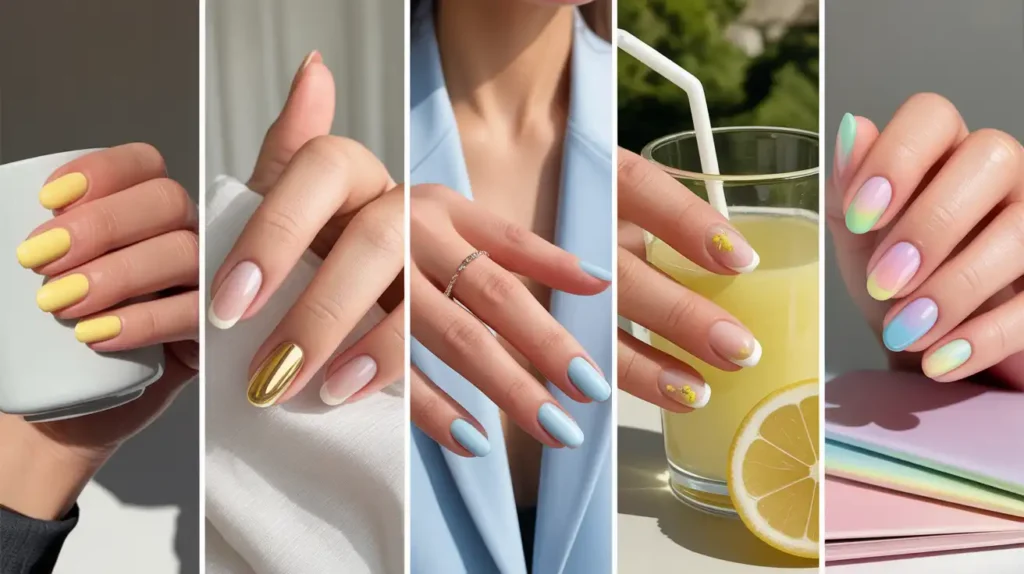
1. Butter Yellow Sunshine
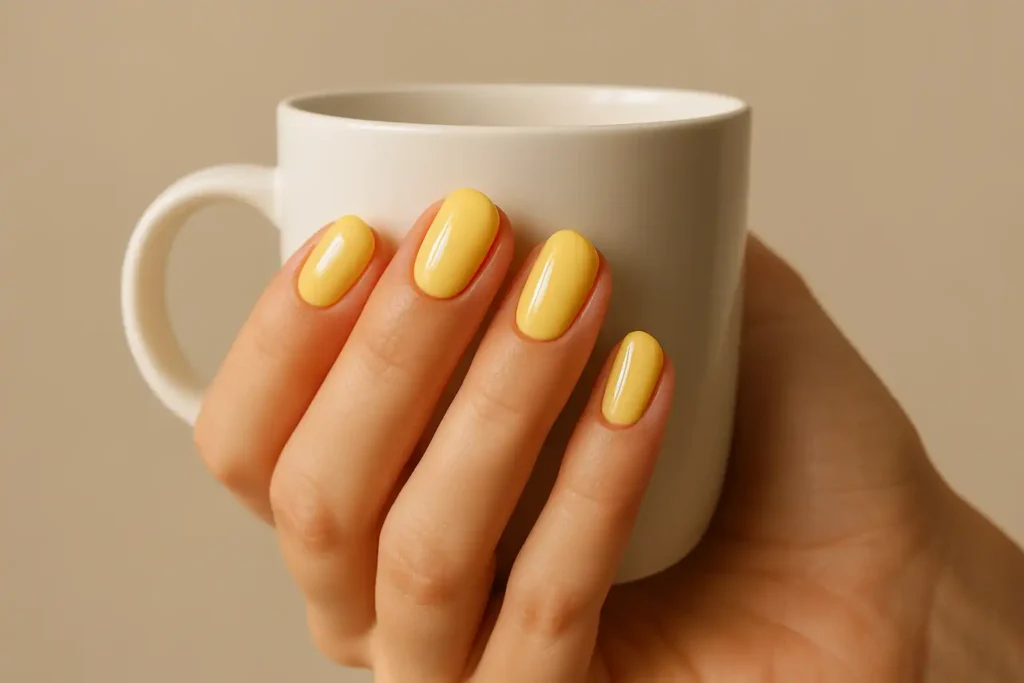
Butter yellow aligns with spring’s fresh, airy feel and pairs well with seasonal fashion trends like floral prints. This elevated neutral works solo for a sophisticated statement or as a base for white daisy accents.
Best For: Office-appropriate elegance, everyday wear
Nail Shape: Works universally, especially flattering on short to medium lengths
Finish Options: Matte for modern, glossy for classic, chrome for futuristic
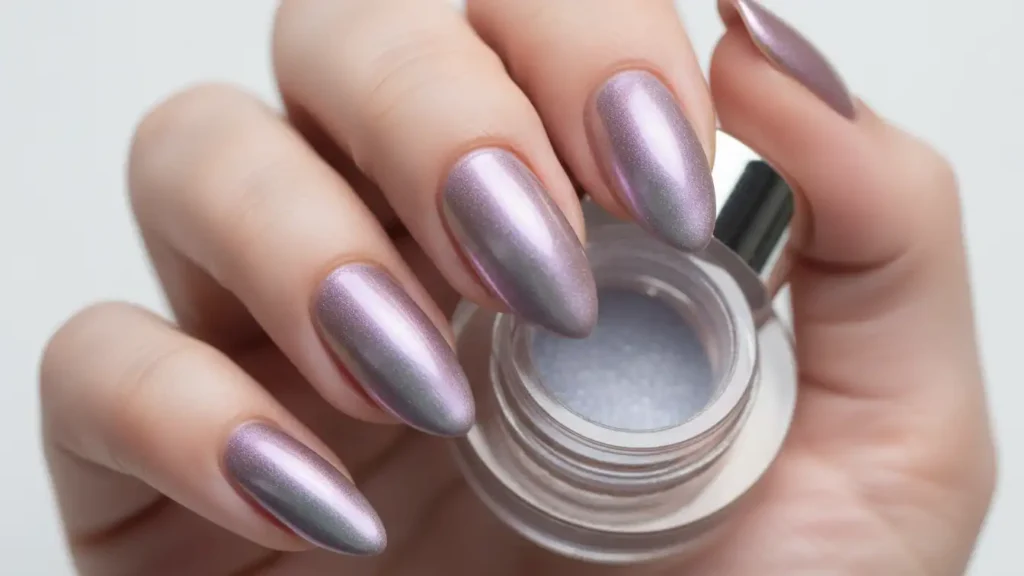
2. Pastel Chrome Collection
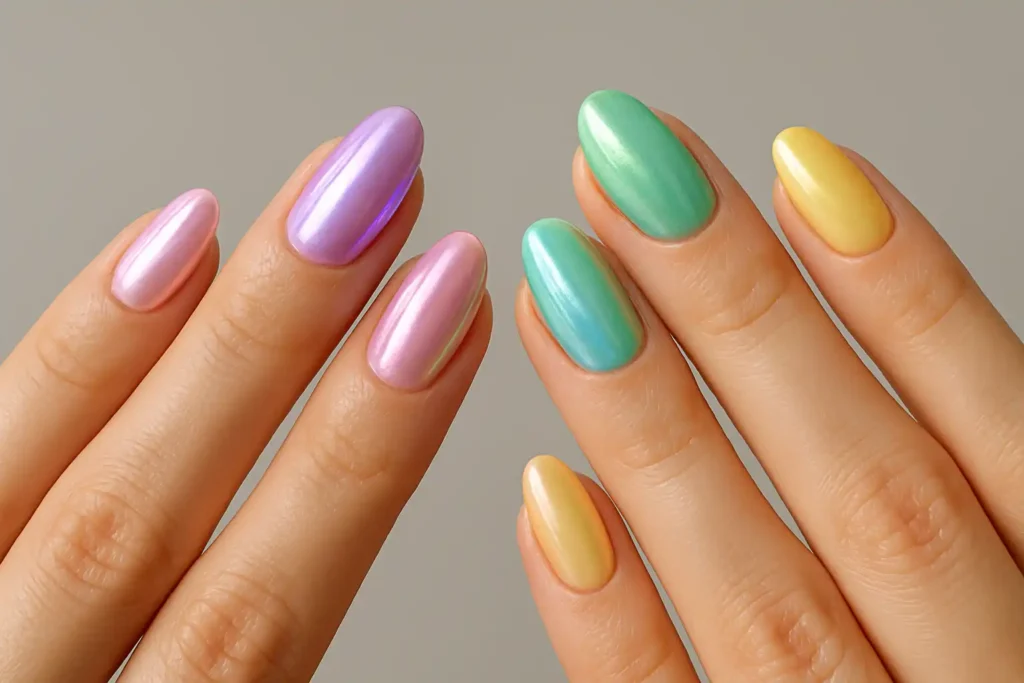
Pastel chrome manicures feature vintage hues like baby pink and blue with iridescent finishes. This trend merges the glazed donut aesthetic with spring’s softer color story.
Color Combinations:
- Lilac chrome with pearl accents
- Mint green chrome with gold foil
- Blush pink chrome with micro rhinestones
- Sky blue chrome with white tips
Pro Tip: Apply chrome powder over a white or light gray base for maximum color pop and smooth application.
3. Neon Brights That Demand Attention
Cherry red—juicy, vibrant, and full of attitude—remains timeless yet fresh for spring. Pair with electric orange, hot pink, or lime green for a festival-ready gradient.
Application Strategy: Use neons as accent nails or French tips to avoid overwhelming your look. Balance one neon nail with four neutral bases for wearable boldness.
4. Coral & Cantaloupe: The Sunset Duo
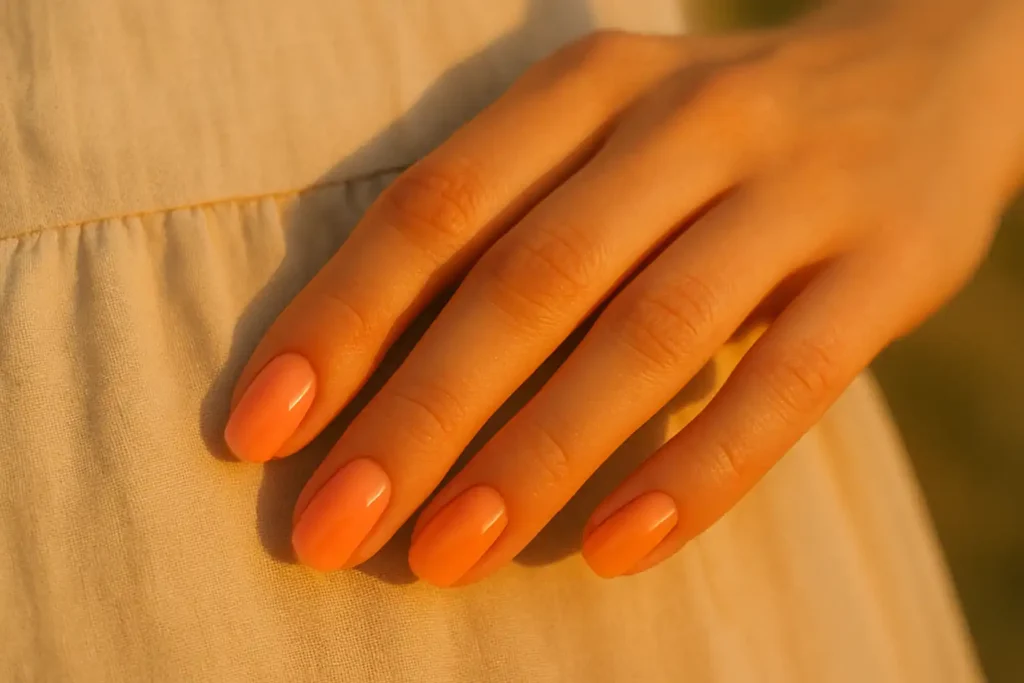
Cantaloupe offers tangerine, orange and salmon hues for a refreshing palette that complements any skin tone. These warm tones evoke golden hour and beachside sunsets.
Styling Ideas:
- Ombre from coral to cantaloupe
- Solid coral base with orange French tips
- Watercolor blended effect
- Alternating coral and cantaloupe nails
5. Mint & Pistachio Greens

Pistachio gained steam thanks to Dubai chocolate bar trends, inspiring designers like Prada, Miu Miu, and Alexander McQueen to embrace saturated green. In nails, this translates to both matte and metallic finishes.
Fresh Combinations:
- Mint green with white daisy art
- Pistachio chrome with gold accents
- Sage green gradient to cream
- Green tips on clear jelly base
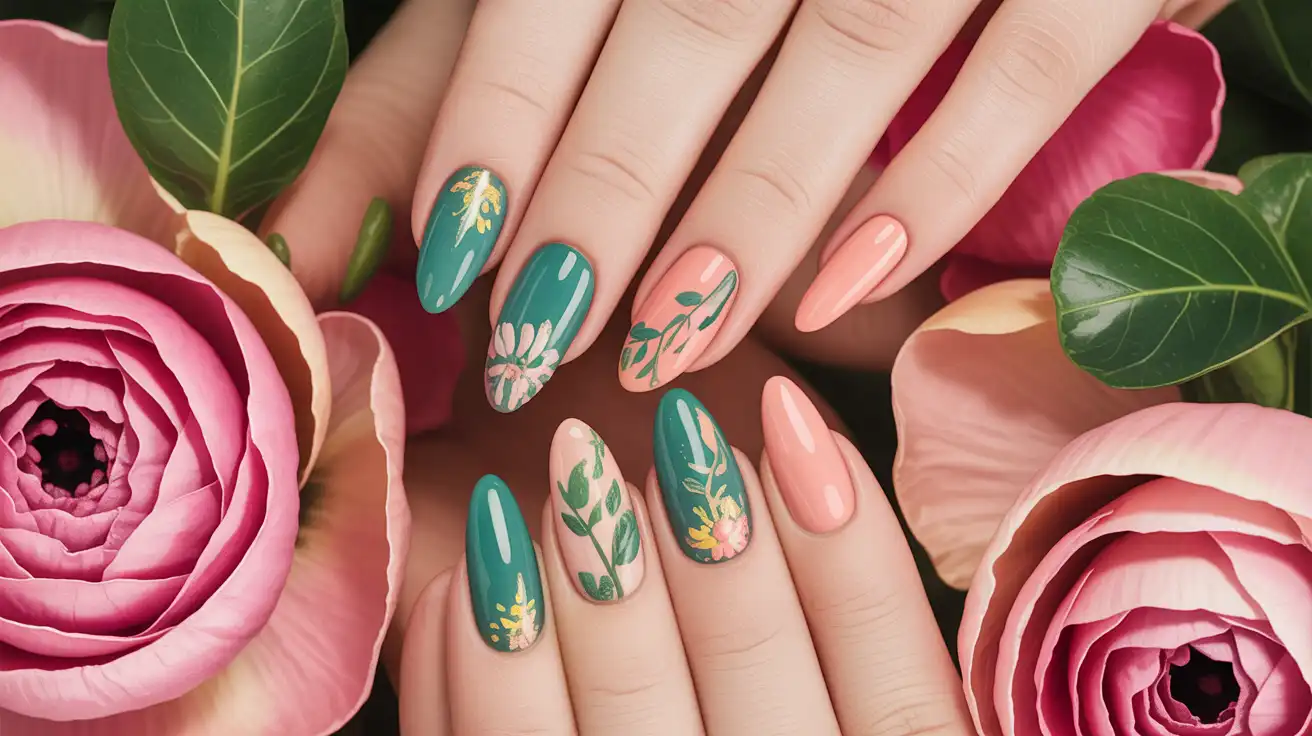
6. Lavender & Lilac Dreams

Soft lilac pastel with its sheer, jelly finish hits the milk manicure wave while giving just enough color to feel summery. These purple-toned pastels read both romantic and modern.
Design Variations:
- Lavender chrome for metallic sheen
- Lilac ombre fading to white
- Purple micro florals on lavender base
- Glitter gradient from cuticle to tip
7. Sky Blue & Baby Blue Serenity

Spring embraces creamy, pastel blue tones like Bubblegum Ice Cream—a strong pastel blue creating vibrant bursts. This color family channels clear skies and Mediterranean tiles.
Professional Applications:
- Baby blue with white geometric patterns
- Sky blue French tips on nude base
- Blue chrome with silver stars
- Marble effect mixing blues and whites
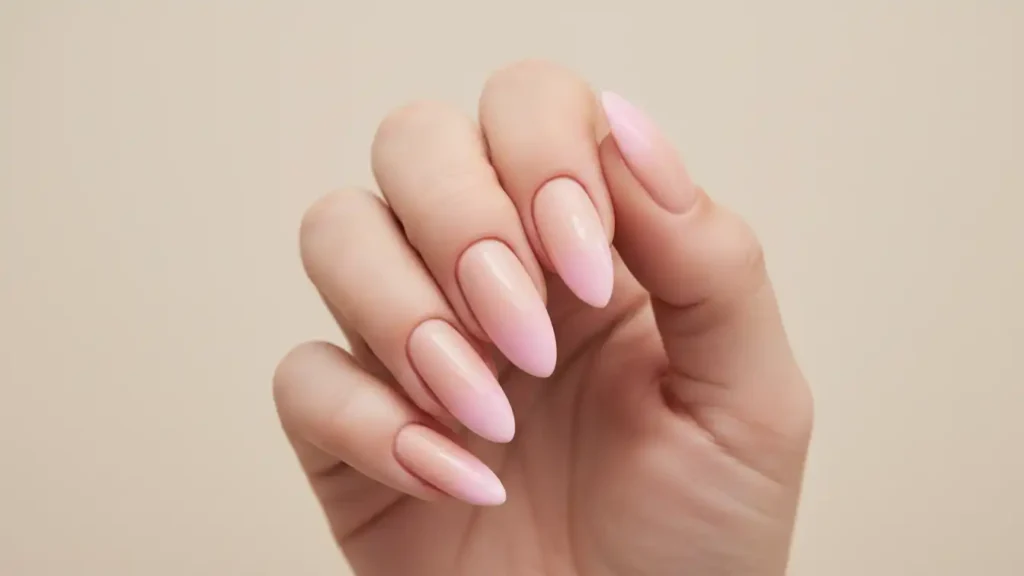
8. Peachy Pink Perfection
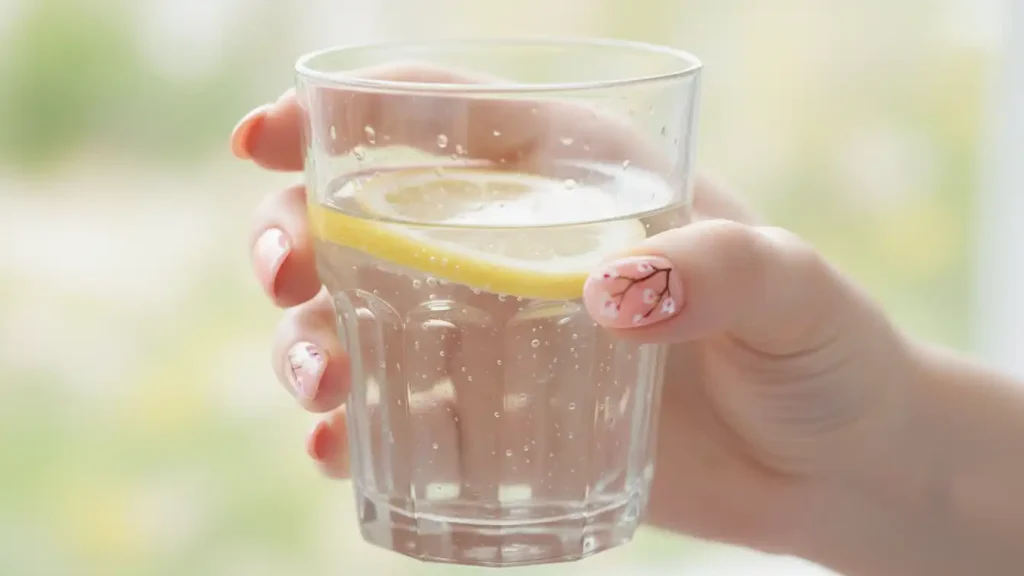
Peachy pink ombre creates gorgeous, seamless effects complementing spring’s light, airy vibe. This universally flattering palette bridges warm and cool tones.
Beginner-Friendly Designs:
- Solid peach nails with one glitter accent
- Pink-to-peach ombre using sponge technique
- Peach base with white cherry blossoms
- French tips in alternating pink/peach
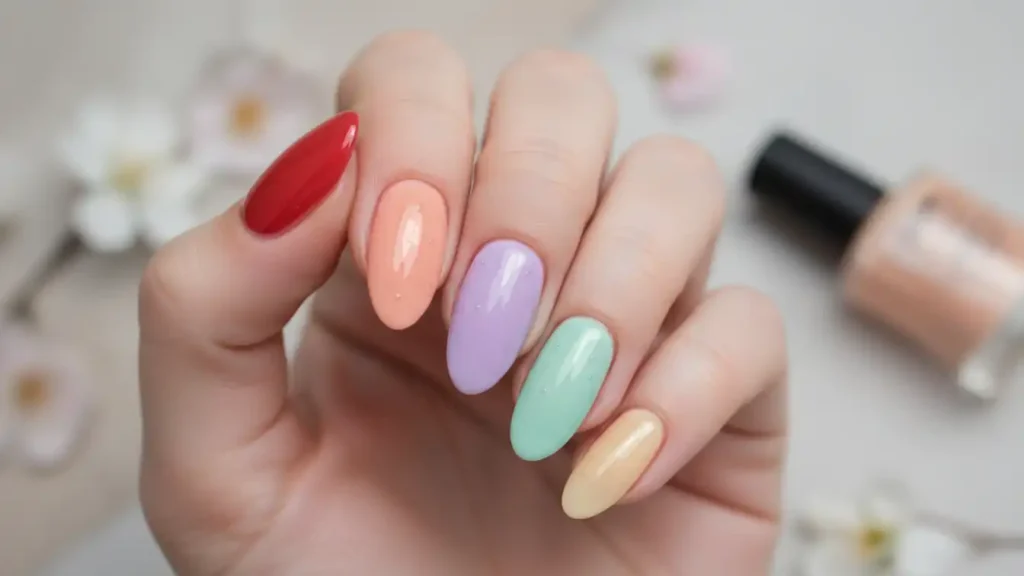
9. Multi-Color Magic: Rainbow Spring

Multicoloured French manicure keeps things simple yet vibrant with bright spring shades applied in ultra-thin lines at tips. This trend celebrates spring’s diversity without overwhelming.
Color Coordination Tips:
- Use tonal families (all pastels or all neons)
- Follow ROYGBIV order for cohesion
- Anchor with one repeated neutral
- Limit to 3-4 colors maximum for elegance
10. Neutral Bases with Strategic Pops
The foundation of sheer, clean “soap nails” provides fresh, effortless vibes that still feel polished. Layer strategic color accents for personality without commitment.
Accent Strategies:
- Nude base with neon tips
- Milky white with one floral nail
- Beige with gold chrome details
- Clear jelly with fruit decals
Trending Techniques: Master Spring 2025’s Hottest Styles
Technique 1: Glazed Donut / Soap Nails
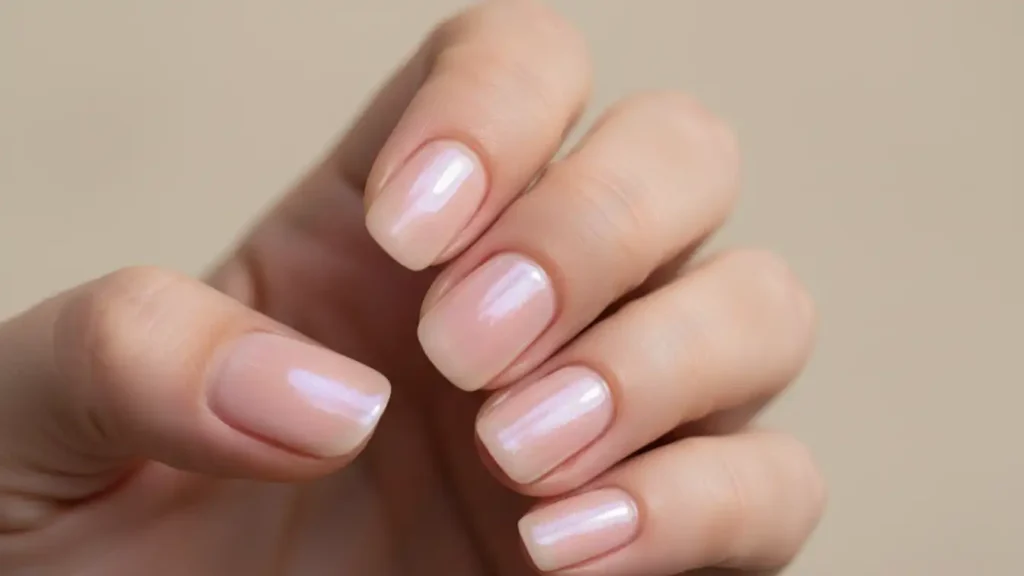
Milky pink nails and marshmallow nails with subtle shimmer take center stage, building on Hailey Bieber’s viral aesthetic.
How to Achieve:
- Start with a sheer pink or nude base coat
- Apply 2 coats of translucent “jelly” polish
- While tacky, dust with pearl or opal chrome powder
- Seal with glass-finish top coat
- Buff to ultra-glossy perfection
Product Recommendations: OPI Bubble Bath, Essie Ballet Slippers, any pearl chrome powder, Seche Vite top coat
Time Required: 45 minutes (including cure time)
Difficulty: Beginner-Intermediate
Longevity: 10-14 days with proper top coat
Technique 2: Jelly Nail Application
Jelly nails serve translucent, vibrant hues that offer playful yet sophisticated color takes, perfect for spring’s light-hearted energy.
Step-by-Step:
- Apply thin layer of clear or white base
- Use jelly polish in 3 thin coats (thick coats won’t cure properly)
- Cure each layer 60 seconds under LED lamp
- Optional: Add glitter or small decals between layers
- Finish with glossy top coat for extra depth
Pro Tips:
- Jelly polishes are sheer—embrace the see-through quality
- Layer different jelly colors for custom shades
- Apply over white for more opaque color
- Perfect for hiding minor nail imperfections
Technique 3: Chrome Powder Magic
Cat eye nails bring bold, magnetic twists with shifting, luminous effects that look like cat eyes thanks to magnetic polishes and chrome applications.
Application Method:
- Apply black or dark base (crucial for chrome vibrancy)
- Cure completely—must be fully hardened
- Apply thick layer of no-wipe gel top coat
- Cure for 60 seconds
- While still tacky, rub chrome powder with silicone applicator
- Buff until mirror-like shine achieved
- Seal with regular top coat (not no-wipe)
Chrome Variations:
- Aurora: Iridescent rainbow shift
- Mirror: True metallic reflection
- Mermaid: Blue-purple-green shift
- Magnetic Cat Eye: Use magnet before powder for lined effect
Common Mistakes: Applying powder over un-cured gel, using wipeable top coat, not buffing enough
Technique 4: 3D Floral Embellishments
3D floral nails bring spring’s beauty to life with stunning depth and texture through intricate, raised flower designs.
Methods:
A. Acrylic 3D Flowers (Advanced):
- Use acrylic monomer and polymer powder
- Shape petals with fine brush
- Build layers for dimensional blooms
- Cure between layers
- Seal entire nail with thick top coat
B. Gel 3D Flowers (Intermediate):
- Use thick, structural gel or builder gel
- Create petals with dotting tool
- Layer colors for depth
- Cure each petal individually
- Add details with thin brush
C. Pre-Made Decals (Beginner):
- Purchase 3D flower stickers or charms
- Apply to tacky gel layer
- Press firmly to embed
- Seal with extra-thick top coat
- File top coat smooth if needed
Design Ideas:
- Micro daisies scattered across nude base
- One statement rose on accent nail
- Cherry blossom branch across multiple nails
- Textured sunflowers with raised centers
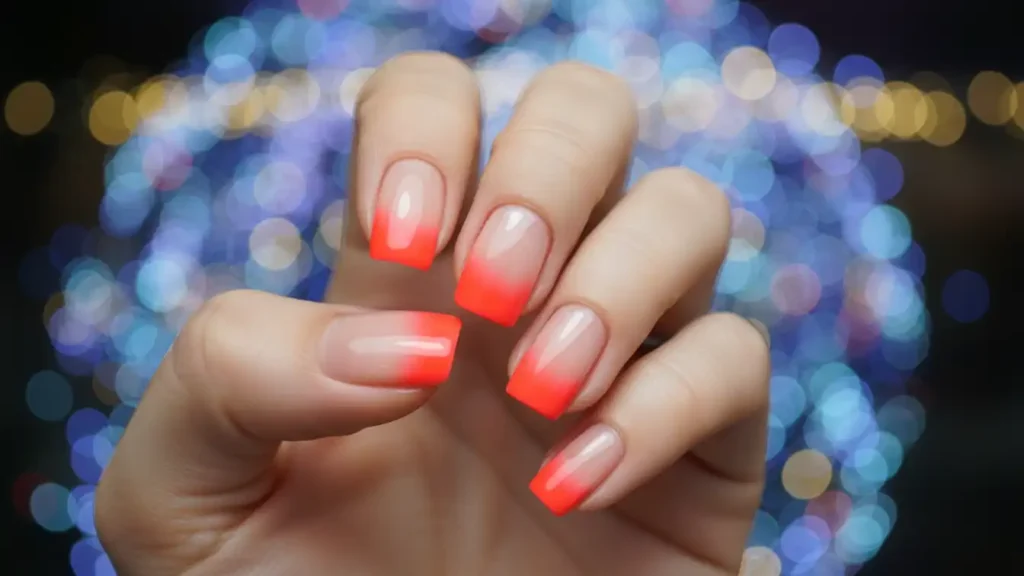
Technique 5: Ombre & Gradient Perfection
Ombre manicures reflect spring’s transitional nature, allowing color experimentation while creating seamless beauty.
Sponge Method (Classic):
- Paint colors side-by-side on makeup sponge
- Dab onto nail in rolling motion
- Clean up edges with brush dipped in acetone
- Repeat 2-3 times for intensity
- Seal with top coat
Brush Method (Advanced):
- Apply lighter color as base
- While wet, dab darker color at tips
- Use clean brush to blend meeting point
- Work quickly before polish dries
- May require practice for smooth transition
Airbrush Method (Professional):
- Requires airbrush tool and compressor
- Spray lighter color across nail
- Mask with tape, spray darker at tips
- Remove tape for crisp gradient line
- Seal with top coat
Technique 6: Aura Nail Designs
Pastel aura centered in bright colors creates surprisingly classy summer looks, using soft gradients radiating from nail center.
Creation Process:
- Start with white or clear base
- Place small amount of colored polish in center
- Use eyeshadow applicator to blend outward
- Create soft, cloud-like edges
- Layer colors for multi-tonal aura
- Cure if using gel, dry completely if regular polish
- Top coat for smooth finish
Popular Aura Combinations:
- Pink aura on blue base
- Yellow aura on green tips
- Multi-color auras on white
- Neon aura on clear jelly
Technique 7: Micro French Tips
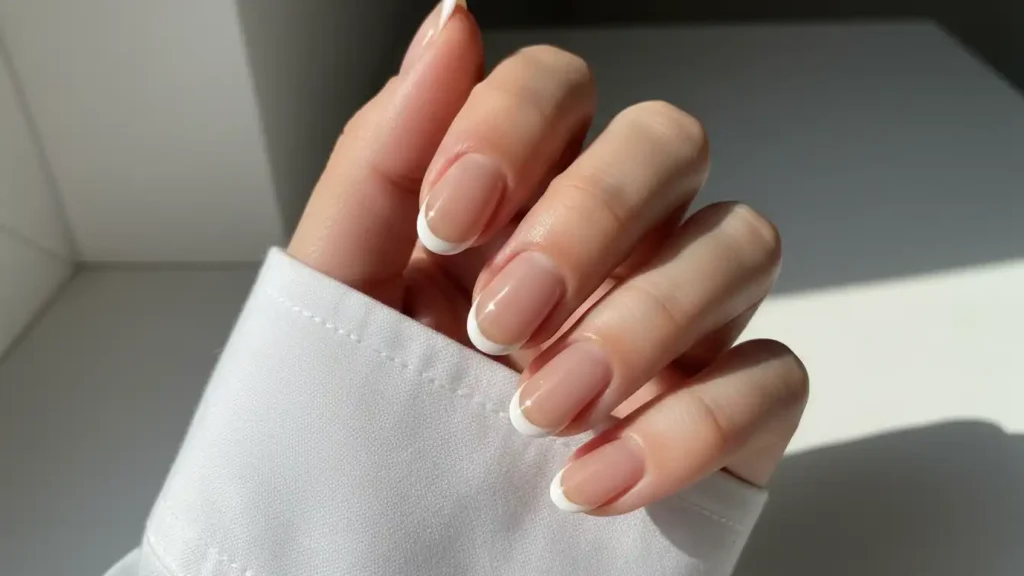
Micro French nails offer minimalistic ways to add color pops with ultra-fine French tips that feel modern and fresh.
Application Technique:
- Apply nude or sheer base (2 coats)
- Use striping brush or fine liner
- Paint ultra-thin line at tips (1-2mm width)
- Keep hand steady—brace on table
- Use tape guide if needed for beginners
- Seal with glossy top coat
Variations:
- Classic white micro French
- Neon color tips
- Metallic gold or silver
- Double micro lines
- Curved vs. straight tips
- Negative space designs
25+ Vibrant Spring Nail Design Ideas
MINIMALIST SPRING DESIGNS (Difficulty: ★☆☆)
1. Butter Yellow Mono
- Solid butter yellow across all nails
- High-gloss top coat for luxury finish
- Best For: Professional settings, all nail lengths
- Time: 30 minutes
2. Milky Soap Nails with Gold Accent
- Sheer milky base on 9 nails
- One accent nail with gold chrome details
- Best For: Understated elegance, everyday wear
- Time: 45 minutes
3. Baby Blue with White Micro French
- Soft blue base
- Ultra-thin white tips
- Best For: Spring formal events, medium to long nails
- Time: 40 minutes
4. Clear Jelly with Lemon Accents
- Translucent clear base
- Tiny painted lemons on 1-2 nails
- Best For: Fun, casual looks, summer transition
- Time: 50 minutes
5. Pastel Ombre Rainbow
- Each nail different pastel shade
- Subtle gradient within each nail
- Best For: Creative professionals, almond or stiletto nails
- Time: 60 minutes
FLORAL & BOTANICAL DESIGNS (Difficulty: ★★☆)
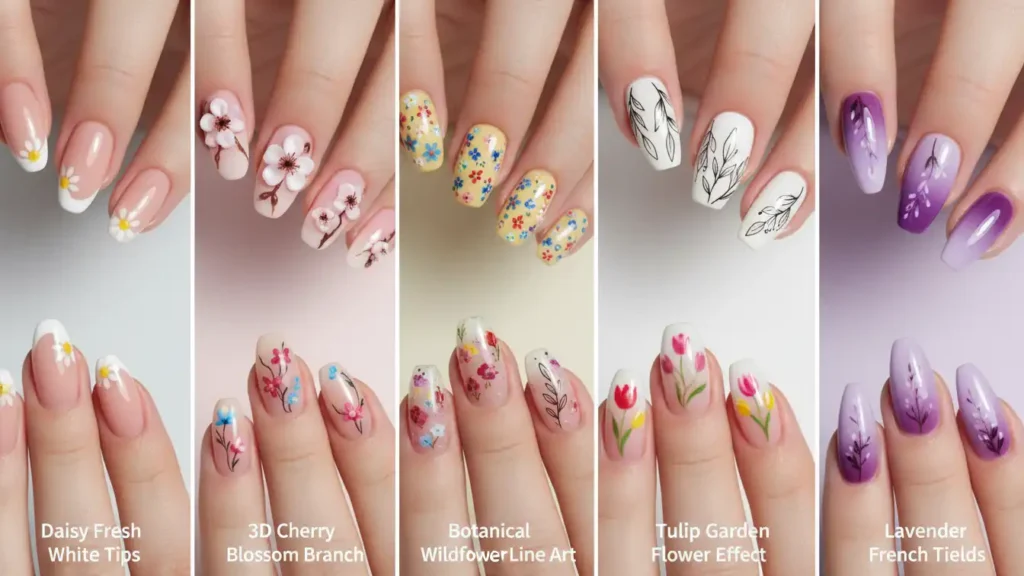
6. Daisy Fresh White Tips
- Nude or pink base
- White French tips
- Hand-painted white daisies with yellow centers
- Best For: Spring weddings, romantic occasions
- Time: 90 minutes
7. 3D Cherry Blossom Branch
- Soft pink gradient base
- Raised gel cherry blossoms
- Brown branch detail connecting across nails
- Best For: Special events, statement nails
- Time: 120 minutes
8. Micro Wildflower Garden
- Butter yellow base
- Tiny multi-colored flowers scattered
- Best For: Festival season, bohemian style
- Time: 75 minutes
9. Botanical Line Art
- White or cream base
- Black line drawings of leaves and stems
- Minimalist, modern aesthetic
- Best For: Fashion-forward looks, square or coffin nails
- Time: 80 minutes
10. Pressed Flower Effect
- Clear or sheer pink jelly base
- Dried flower petals embedded
- Extra-thick top coat for smoothing
- Best For: Natural beauty enthusiasts, unique texture lovers
- Time: 90 minutes (plus drying)
11. Tulip Garden French Tips
- White base
- Colored tulips painted at tips
- Mix of red, yellow, pink varieties
- Best For: Dutch-inspired spring style
- Time: 85 minutes
12. Lavender Fields
- Purple ombre from light to dark
- Tiny lavender sprigs in darker areas
- Best For: Aromatherapy enthusiasts, purple lovers
- Time: 95 minutes
FRUITY & PLAYFUL DESIGNS (Difficulty: ★★☆)
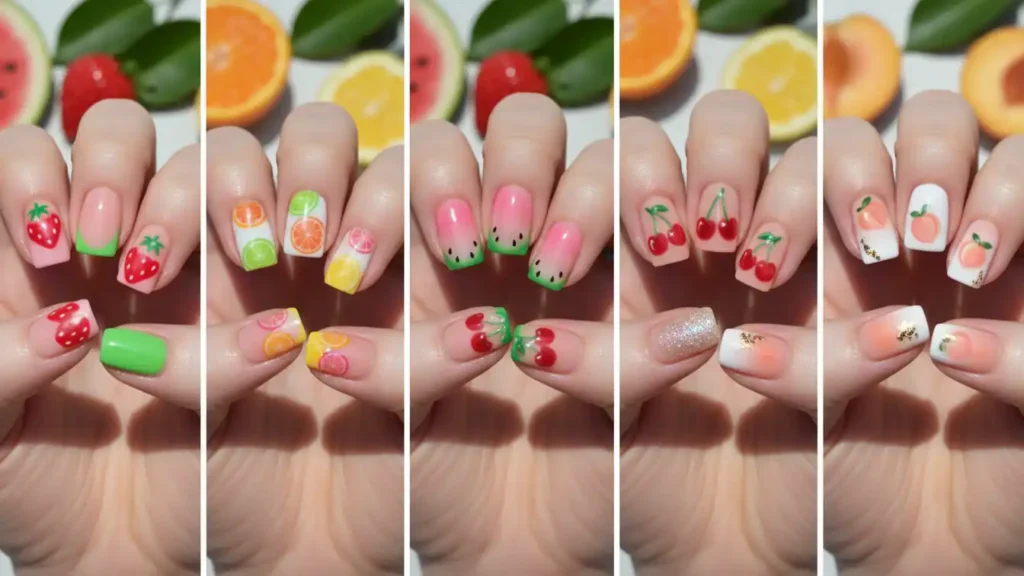
13. Strawberry Shortcake
- Pink base
- Red strawberries with green leaves
- White dots for seeds
- Optional: one nail with green French tip
- Best For: Summer picnics, cute aesthetic
- Time: 75 minutes
14. Citrus Burst
- White base
- Orange, lemon, and lime slice accents
- Yellow tips on accent nails
- Best For: Tropical vibes, vacation nails
- Time: 80 minutes
15. Watermelon Sugar
- Pink aura base
- Green French tips
- Black seeds painted
- Best For: July-August transition, fruity fun
- Time: 70 minutes
16. Cherry On Top
- Nude or white base
- Red cherries with green stems
- Optional glitter accent
- Best For: Retro-inspired looks, diner aesthetic
- Time: 65 minutes
17. Peachy Keen Gradient
- White to peach ombre
- Small peach illustrations
- Gold leaf accents
- Best For: Soft glam, summer transition
- Time: 85 minutes
CHROME & METALLIC DESIGNS (Difficulty: ★★★)
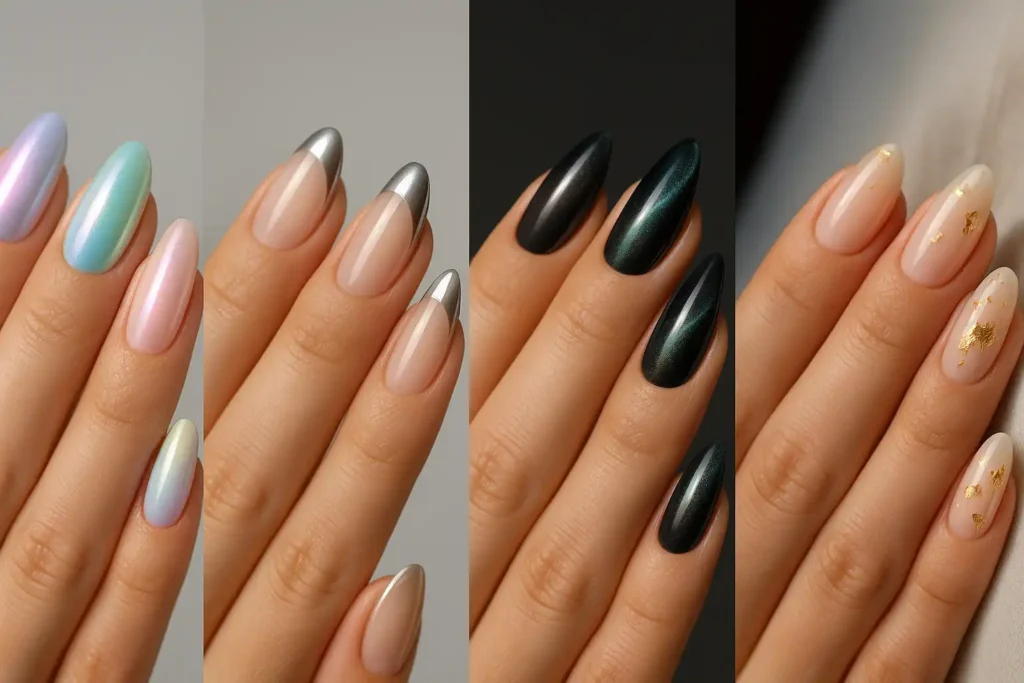
18. Pastel Chrome Multi
- Different pastel chrome on each nail
- Mix lavender, mint, pink, blue, yellow
- Best For: Fashion statements, editorial looks
- Time: 90 minutes
19. Mirror Silver French
- Nude base
- Silver chrome French tips
- Clean, modern aesthetic
- Best For: Tech industry, minimalist style
- Time: 70 minutes
20. Aurora Borealis Nails
- Black base
- Aurora chrome powder
- Magnetic cat-eye effect layered
- Best For: Evening wear, statement nails
- Time: 100 minutes
21. Gold Foil Abstract
- Sheer nude base
- Random gold foil placement
- Glossy top coat
- Best For: Luxe casual, elevated basics
- Time: 60 minutes
TEXTURED & 3D DESIGNS (Difficulty: ★★★)
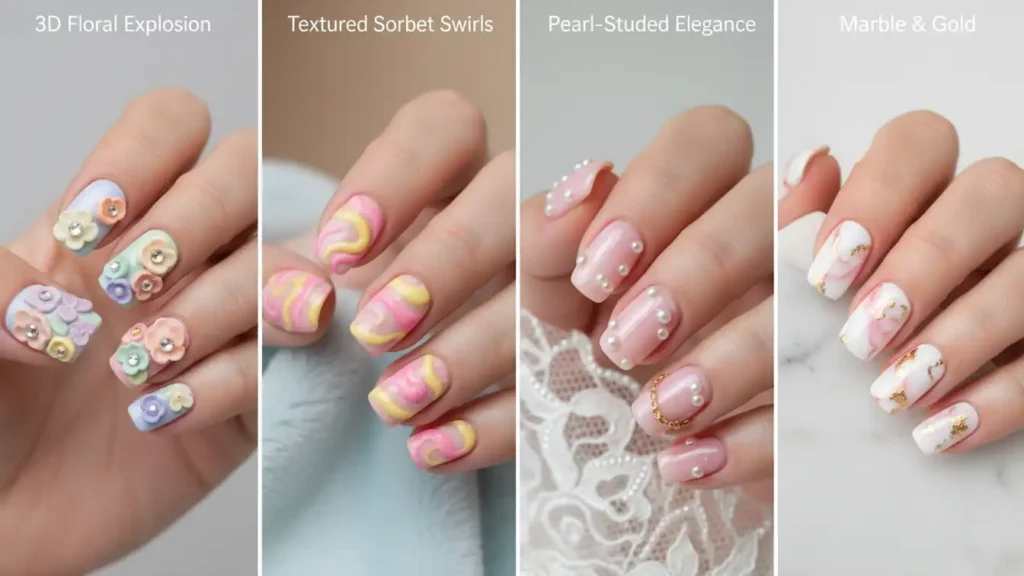
22. 3D Floral Explosion
- Pastel base (your choice)
- Multiple raised gel flowers
- Rhinestone centers
- Best For: Instagram-worthy moments, special occasions
- Time: 150 minutes
23. Textured Sorbet Swirls
- Pink and yellow base
- Raised gel swirls
- Matte top coat
- Best For: Unique texture lovers, conversation starters
- Time: 110 minutes
24. Pearl-Studded Elegance
- Soft pink soap nails
- Tiny pearl flat-backs scattered
- Delicate chain details
- Best For: Weddings, upscale events
- Time: 95 minutes
25. Marble & Gold Leaf
- White base
- Pink and gold marble effect
- Actual gold leaf fragments
- Best For: Luxury aesthetic, artistic expression
- Time: 120 minutes
BONUS TREND: MIX & MATCH MAXIMALISM
26. Asymmetric Spring Story
- Each nail tells different story
- Combine florals, fruits, chrome, patterns
- Unified color palette keeps cohesive
- Best For: Creative expression, trend combination
- Time: 180+ minutes
DIY vs. Salon: Cost, Time & Results Compared
Cost Breakdown
DIY Initial Investment:
- LED/UV lamp: $25-$60
- Base coat: $8-$15
- Color polishes (5): $40-$75
- Top coat: $10-$18
- Chrome powders: $8-$20
- Tools (brushes, dotting tools, files): $15-$30
- Total Initial: $106-$218
DIY Per-Manicure Cost:
- Polish usage: ~$3-$5
- Additional materials (decals, etc.): $2-$10
- Total Per Mani: $5-$15
Salon Costs:
- Basic gel manicure: $35-$60
- Gel with simple art: $50-$80
- Complex designs (3D, chrome, detailed art): $80-$150+
- Frequency: Every 2-3 weeks
Break-Even Analysis: DIY investment pays for itself after 3-4 salon visits if you maintained regular mani schedule.
If you’re trying to keep your mani habit budget-friendly, pair this guide with my breakdown of money habits of women who stay quietly never broke.
Time Investment
DIY Time:
- Simple design: 30-60 minutes
- Moderate complexity: 60-90 minutes
- Advanced designs: 90-180 minutes
- Plus: Learning curve for first 3-5 attempts
Salon Time:
- Travel + wait + service: 60-120 minutes
- Complex designs: 90-150 minutes
- Plus: Zero learning curve
Results Comparison
DIY Advantages:
- Complete creative control
- Unlimited revision time
- Practice builds skills
- Relaxing at-home ritual
- No scheduling constraints
- Cost-effective long-term
DIY Challenges:
- Dominant hand difficulty
- Learning curve requires patience
- Tool investment required
- Storage space needed
- Cleanup responsibility
Salon Advantages:
- Professional precision
- Access to advanced techniques
- Consistent results immediately
- Nail health assessment
- Social/relaxation experience
- Complex art achievable without practice
Salon Challenges:
- Higher per-visit cost
- Scheduling required
- Limited revision opportunities
- Time commitment includes travel
- Communication challenges possible
The Verdict
Choose DIY if you:
- Enjoy hands-on creativity
- Want long-term cost savings
- Have 1-2 hours per session
- Prefer simple to moderate designs
- Like learning new skills
Choose Salon if you:
- Want immediate professional results
- Value time over money
- Desire complex 3D or advanced art
- Struggle with dominant hand application
- Appreciate professional environment
Hybrid Approach: Get salon manis for special events or complex designs, DIY maintenance and simple looks between appointments. This balances cost, quality, and convenience.
How to Communicate with Your Nail Tech
When booking salon appointments for vibrant spring designs:
- Save Reference Photos: Bring 2-3 examples showing desired style
- Specify Techniques: Name exact techniques (chrome, jelly, 3D, etc.)
- Discuss Timeline: Complex designs require extended appointments
- Ask About Products: Request specific brands if preferred
- Budget Communication: Establish price before starting
- Shape Preferences: Specify oval, square, stiletto, etc.
- Length Decisions: Discuss natural vs. extension options
Script Example: “I’d like pastel chrome nails with 3D daisies on my ring fingers. I brought photos showing the chrome finish I want. I have 90 minutes available—is that enough time? My budget is $100.”
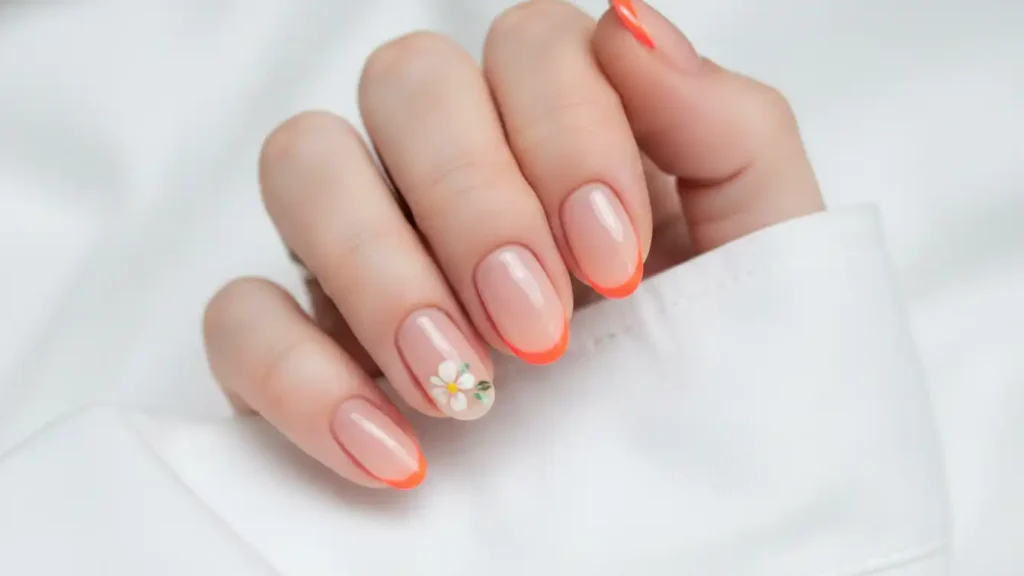
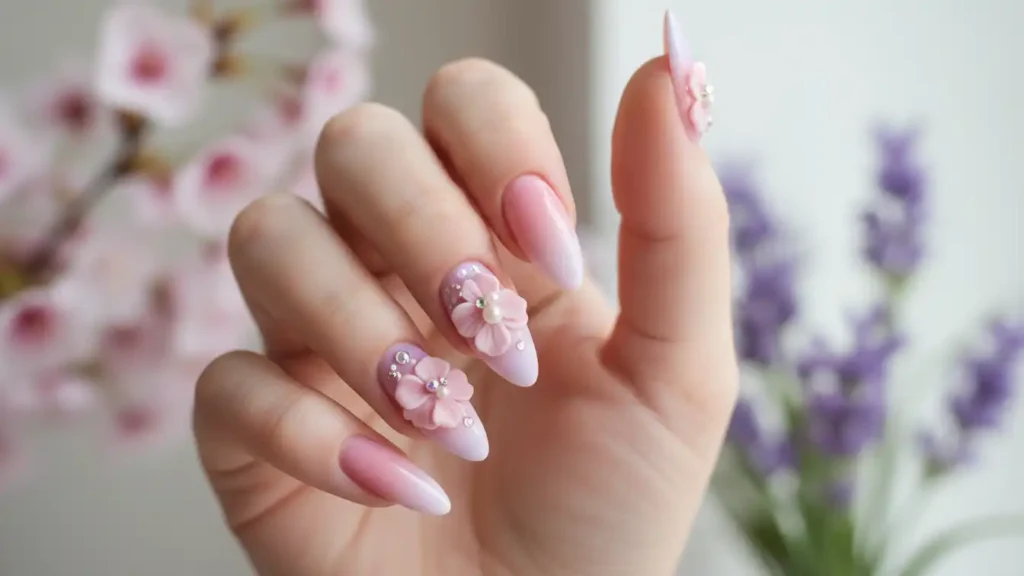
Step-by-Step Tutorial: Pastel Chrome Florals
This signature spring look combines three trending techniques: soap nails, chrome, and micro florals. Result: Instagram-worthy elegance that’s surprisingly achievable.
What You’ll Need
Products:
- Base coat (OPI Natural Nail Base or similar)
- Sheer pink jelly polish (Essie Mademoiselle or OPI Bubble Bath)
- No-wipe gel top coat
- Lavender chrome powder
- White gel polish or acrylic paint
- Yellow gel polish or paint for centers
- Regular gel top coat
- Cuticle oil
Tools:
- LED/UV nail lamp (36W minimum)
- Fine detail brush (size 00 or 000)
- Chrome powder applicator (silicone or eyeshadow applicator)
- Dotting tool
- Lint-free wipes
- Rubbing alcohol
Time Required: 90 minutes
Difficulty: Intermediate
Longevity: 14-21 days
Step-by-Step Instructions
PREP PHASE (15 minutes):
- Remove Old Polish: Use acetone-based remover, ensure clean surface
- Shape Nails: File to desired shape—oval recommended for this design
- Push Back Cuticles: Use cuticle pusher, trim excess carefully
- Buff Surface: Lightly buff nail plate with 180-grit buffer for adhesion
- Cleanse: Wipe with rubbing alcohol to remove oils
- Let Dry: Wait 2-3 minutes for complete dryness
BASE APPLICATION (20 minutes):
- Apply Base Coat: Thin layer, cap free edge, cure 60 seconds
- First Jelly Layer: Ultra-thin coat of pink jelly polish
- Less is more—should be nearly transparent
- Cure 30 seconds
- Second Jelly Layer: Slightly thicker but still translucent
- This builds the “soap nail” effect
- Cure 30 seconds
- Third Jelly Layer (optional): For more color intensity
- Cure 60 seconds
CHROME APPLICATION (20 minutes):
- No-Wipe Top Coat: Apply thicker than usual layer
- Must be tacky for chrome adherence
- Cure 60 seconds—confirm fully hardened
- Chrome Powder Application:
- Scoop small amount onto nail surface
- Use applicator to rub in circular motions
- Apply firm pressure—powder must bond
- Continue until mirror-like shine achieved
- Brush away excess powder
- Repeat: Complete chrome on all 10 nails before sealing
- Seal Without Top Coat Yet: We’ll add florals first
FLORAL DETAILS (30 minutes):
- Mark Placement: Mentally plan flower positions
- Recommend 2-3 small flowers per accent nail (ring fingers)
- Keep other nails plain chrome
- Create Flower Centers:
- Use dotting tool with yellow polish
- Place 5 dots in a circle
- Cure if using gel (30 seconds)
- Add Petals:
- Use fine detail brush with white
- Paint 5-6 small petals around yellow center
- Keep petals rounded and slightly overlapping
- Work on one flower at a time
- Cure after each flower (30 seconds if gel)
- Add Leaves (optional):
- Tiny green strokes between some flowers
- Two small leaves per flower maximum
- Dimension (optional):
- Add second white layer to petal edges for 3D effect
- Cure each addition
FINAL SEALING (5 minutes):
- Top Coat Application:
- Regular gel top coat (not no-wipe)
- Thick layer covering everything
- Cap free edges
- Cure 60 seconds
- Second Top Coat Layer:
- Extra protection for chrome and art
- Cure 60 seconds
- Final Wipe: Clean any tacky residue with alcohol
- Cuticle Oil: Massage into cuticles and skin
Troubleshooting Common Issues
Chrome Looks Patchy:
- Solution: Applied over un-cured base. Redo with fully cured no-wipe top coat.
Flowers Look Messy:
- Solution: Use thinner brush, thin paint consistency, practice on paper first.
Polish Won’t Cure:
- Solution: Lamp bulbs may need replacement. Try 120-second cure time.
Chrome Rubs Off:
- Solution: Must seal with regular top coat (not no-wipe). Add second top coat layer.
Design Too Time-Consuming:
- Solution: Use pre-made floral decals instead of hand-painting. Apply over chrome, seal with top coat.
Variations to Try
- Replace lavender chrome with mint, pink, or blue
- Use cherry blossoms instead of daisies
- Add micro rhinestone centers instead of yellow
- Try aura effect base before chrome
- Alternate chrome and non-chrome nails
Making Your Spring Manicure Last 2+ Weeks
Pre-Application Secrets
1. Nail Dehydration
- Remove all oils before polish
- Use rubbing alcohol or dedicated dehydrator
- Skip hand lotion 24 hours before application
- This single step extends wear by 40%
2. Proper Buffing
- Light surface buffing creates texture for adherence
- Don’t over-buff—thin nails increase breakage risk
- Use 180-grit buffer in one direction
- Focus on nail plate, avoid cuticle area
3. Quality Base Coat
- Invest in professional-grade base ($10-15)
- Look for ones with adhesion promoters
- Apply thin layer, cap free edge
- Wait full cure time before color
During Application Best Practices
4. Thin Layer Philosophy
- Multiple thin coats outlast one thick coat
- Thick polish can’t cure properly, leads to peeling
- Each layer should be nearly translucent
- Cure between every layer
5. Cap the Free Edge
- Drag brush across nail tip with each coat
- This seals the edge where chipping starts
- Do this with base, color, AND top coat
- Critical for longevity
6. Cure Times Matter
- Don’t shortcut cure times to save minutes
- Undercured polish peels within days
- Add 15-30 seconds to recommended times
- Check lamp bulb age—replace annually
7. Avoid Cuticle Contact
- Leave 1mm gap between polish and cuticle
- Polish on skin causes lifting at cuticle line
- Clean mistakes immediately with brush dipped in acetone
- Perfect application = fewer entry points for peeling
Post-Application Maintenance
8. 24-Hour Protection Period
- Avoid hot water, baths, pools for 24 hours after gel application
- Don’t apply hand lotion immediately
- Gel needs time to fully harden even after curing
- This waiting period is often overlooked but critical
9. Daily Top Coat Refresh
- Apply thin layer of top coat every 3-4 days
- This seals minor surface wear
- Takes 2 minutes, extends life by a week
- Focus on tips where wear is visible
10. Cuticle Oil Ritual
- Apply twice daily—morning and night
- Keeps polish flexible, prevents cracking
- Hydrated cuticles prevent lifting
- Use vitamin E or jojoba oil for best results
11. Glove Up
- Wear gloves for dishes, cleaning, gardening
- Water exposure is polish’s biggest enemy
- Harsh chemicals break down gel structure
- This single habit can double manicure lifespan
12. Strategic Touch-Ups
- At first sign of tip wear, add color + top coat to edge only
- Small repairs prevent full chip scenarios
- Keep polish bottle accessible for quick fixes
- 5-minute touch-up saves full 90-minute redo
Removal Done Right
13. Gentle Removal Process
- Never peel or pick at gel polish
- Soak in acetone-soaked cotton wrapped in foil
- Wait 15-20 minutes for full breakdown
- Gently push off softened gel—no forcing
- Peeling damages nail plate, causing weak spots
14. Post-Removal Recovery
- Apply nail strengthener or keratin treatment
- Give nails 24-48 hours between gel applications
- Use cuticle oil generously during break periods
- Consider one “naked nail” week per month for health
Products That Make a Difference
Longevity All-Stars:
- Base Coat: OPI Natural Nail Base, Gelish Foundation
- Top Coat: Seche Vite (regular), Beetles No-Wipe (gel)
- Cuticle Oil: CND SolarOil, Cuccio Naturale
- Dehydrator: Young Nails Protein Bond, Mia Secret Nail Prep
Investment Priority: If budget is limited, splurge on base and top coat before color. These directly impact longevity.
Spring Nail Care Essentials
Seasonal Nail Health Challenges
Spring presents unique nail care needs as we transition from winter’s indoor dryness to outdoor activities, gardening, and increased sun exposure.
Winter Damage Assessment:
- Dark winter polish may have stained nails yellowish
- Dryness from heating systems causes brittleness
- Lack of sunlight reduces vitamin D for nail growth
- Heavy gloves wore down nail structure
Spring Recovery Plan:
Week 1-2: Repair & Strengthen
- Remove all polish, go natural
- Apply keratin nail treatment daily
- Take biotin supplement (check with doctor)
- Massage cuticle oil 3x daily
- Gentle buffing to remove stains
Week 3-4: Hydration Focus
- Overnight treatments with heavy oils
- Paraffin wax dips weekly
- Hand masks before bed
- Increase water intake
- Add omega-3 foods to diet
Week 5+: Protective Styling
- Reintroduce polish gradually
- Start with strengthening base coats
- Choose lighter colors to monitor health
- Maintain oil application ritual
Essential Spring Nail Care Products
Strengtheners:
- OPI Nail Envy: Protein-based formula for weak nails
- Duri Rejuvacote: Maximum strength treatment
- Nailtiques Formula 2: For soft, peeling nails
- Application: Apply as base coat or standalone treatment
Hydration:
- CND SolarOil: Jojoba and vitamin E blend
- Burt’s Bees Lemon Butter Cuticle Cream: Natural option
- OPI Avoplex Oil: Avocado-based treatment
- Application: Massage into cuticles 2x daily minimum
Stain Removal:
- Ella + Mila Nail Care Soy Nail Polish Remover: Gentle formula
- Lemon Juice + Baking Soda: Natural brightening paste
- Whitening Toothpaste: Gentle buffing treatment
- Application: 1-2x weekly until staining fades
Growth Support:
- Biotin Supplements: 2500-5000 mcg daily
- Collagen Peptides: Mix in morning coffee
- Iron-Rich Foods: Spinach, lentils, red meat
- Vitamin E: Capsules can be opened onto nails
Daily Nail Care Routine
Morning (5 minutes):
- Apply cuticle oil to all fingers
- Massage in circular motions 30 seconds per hand
- Apply hand cream, avoiding immediate nail area if polishing today
- Check for chips or lifting—address immediately
Evening (5 minutes):
- Remove any polish buildup or debris
- Apply strengthening treatment if using
- Heavy cuticle oil or overnight treatment
- Optional: wear cotton gloves to bed for intensive hydration
Weekly (30 minutes):
- Assess nail health—check for discoloration, brittleness
- Gently push back cuticles after shower
- File nails to preferred shape
- Buff surface lightly if needed
- Apply intensive treatment mask
- Plan next manicure timing
Warning Signs & When to See a Professional
Normal Spring Changes:
- Faster growth rate (spring sun stimulates growth)
- Slight texture changes from humidity
- Minor yellowing from dark winter polish
Concerning Signs Requiring Professional Assessment:
- Persistent Yellow/Green Discoloration: Possible fungal infection
- Thick, Crumbly Texture: May indicate deeper fungal issues
- Horizontal Ridges (Beau’s Lines): Can signal health events
- Painful Swelling at Cuticles: Possible infection (paronychia)
- Black Lines Under Nail: Requires immediate medical evaluation
- Nail Separation from Bed: Could indicate various conditions
When to Consult:
- Any sign that doesn’t improve in 2-3 weeks
- Painful symptoms
- Rapid changes
- Recurring issues despite good care
Frequently Asked Questions
What are the trending spring nail colors for 2025?
Butter yellow leads spring 2025 as the standout pastel, balancing muted softness with memorable vibrancy. Other trending shades include pastel chrome variations (lavender, mint, baby blue), cantaloupe orange, pistachio green, and classic coral pinks. The season emphasizes sheer, “soap nail” finishes that prioritize healthy nail appearance with subtle color.
How do you make spring nail designs last longer?
Longevity requires strategic preparation and maintenance: properly dehydrate nails before application, use quality base coat, apply thin polish layers, cap free edges with every coat, cure gel completely, avoid cuticle contact, apply cuticle oil twice daily, wear gloves for wet work, and refresh top coat every 3-4 days. These practices can extend manicure life from 10-14 days to 2-3 weeks.
What’s the difference between gel and regular polish for spring nails?
Gel polish requires LED/UV curing, lasts 2-3 weeks without chipping, maintains glossy finish throughout wear, and requires acetone soak for removal. Regular polish air-dries, lasts 3-7 days, may chip or dull quickly, but removes easily with standard remover. Gel better suits spring’s active outdoor lifestyle, while regular polish allows frequent color changes to match seasonal wardrobe shifts.
Can you do vibrant spring nails at home?
Yes—most spring designs are DIY-friendly with proper tools and practice. Simple designs (solid colors, basic ombre, micro French) succeed with minimal experience. Intermediate designs (chrome application, simple florals) require practice but are achievable within 3-5 attempts. Advanced techniques (3D flowers, complex art) may warrant salon visits unless you’re experienced. Initial tool investment ($100-200) pays for itself after 3-4 manicures.
What nail shape works best for spring designs?
Oval nails are most versatile for spring designs, working equally well with minimalist and bold aesthetics while offering structural strength. Short square suits geometric patterns and professional settings. Almond elongates fingers and showcases florals beautifully. Stiletto makes statement designs dramatic but requires length and careful maintenance. Choose based on lifestyle: active hands need shorter lengths, statement seekers can embrace longer styles.
How much does a spring nail design cost at a salon?
Basic gel manicure with simple spring colors costs $35-60. Adding basic art (French tips, simple florals) increases price to $50-80. Complex designs featuring 3D elements, detailed hand-painting, or chrome finishes run $80-150+. Prices vary by location and salon prestige. To manage costs, choose 1-2 accent nails with detailed art and keep remaining nails simple.
What tools do I need for DIY spring nail art?
Essential starter kit includes: LED/UV lamp ($25-60), base coat ($8-15), color gel polishes ($8-12 each, start with 5), top coat ($10-18), fine detail brushes set ($10-20), dotting tools ($5-10), nail file and buffer ($8), cuticle pusher and trimmer ($8), and cuticle oil ($8-15). Optional additions: chrome powder ($8-20), stamping plates ($10-25), 3D embellishments ($5-15), and airbrush kit ($40-100 for advanced users). Total essential investment: $100-180.
Are spring nail trends different for short nails?
Short nails excel with spring 2025 trends because many emphasize minimalism and delicate details. Soap nails, micro French tips, single accent florals, and pastel chrome all look stunning on short lengths. Avoid overly complex patterns that overwhelm small canvases. Instead, choose: one statement nail with detail and four solid complements, vertical design elements that elongate, or all-over subtle patterns like tiny dots or micro florals.
How do I remove gel spring nails without damage?
Proper removal prevents nail damage: file off glossy top layer to break seal, soak cotton pads in pure acetone, place on each nail, wrap fingertips in aluminum foil, wait 15-20 minutes, gently push softened gel off with cuticle pusher (never force or peel), buff away any residue gently, wash hands thoroughly, apply nail strengthener, and massage in cuticle oil. Schedule removal 30-45 minutes minimum. If gel doesn’t slide off easily after soaking, re-wrap and wait longer rather than scraping.
Can spring nail designs work for professional settings?
Absolutely—many spring 2025 trends suit professional environments: sheer soap nails with subtle shimmer, nude bases with micro French tips, single accent nail with delicate floral, pastel chrome in muted tones, or solid butter yellow/soft pink. Keep art minimal, avoid large 3D elements, choose shorter lengths, and select classic shapes like oval or short square. Bold neons and fruit designs work better for creative industries or casual Fridays.
What’s the best way to learn spring nail art techniques?
Progressive learning works best: start with YouTube tutorials for basic techniques (search specific methods like “jelly nail tutorial” or “chrome powder application”), practice on nail wheels or fake tips before your hands, master one technique fully before adding another, follow nail artists on Instagram for inspiration and tips, join nail art communities on Reddit or Facebook for troubleshooting, and consider online courses from platforms like Skillshare. Budget 5-10 practice sessions per new technique for competency.
How do I choose spring colors that complement my skin tone?
Color theory provides guidance: warm skin tones (golden/peachy undertones) glow with coral, cantaloupe, peachy pink, butter yellow, and warm reds. Cool skin tones (pink/blue undertones) shine with lavender, baby blue, mint green, cherry red, and pure white. Neutral skin tones (mix of warm/cool) can wear virtually any spring shade. When uncertain, test colors on a swatch stick against your wrist in natural light before committing to full manicure.
Are 3D spring nail designs worth the effort?
3D designs deliver maximum impact for special occasions—weddings, photoshoots, festivals—where extra effort justifies stunning results. For everyday wear, they require careful handling (can snag on clothing), longer application time (90-180 minutes), and higher maintenance. Consider 3D elements on 1-2 accent nails only for balanced wearability. Pre-made 3D decals offer similar aesthetic with easier application, making them ideal for DIYers wanting dimensional looks without advanced skills.
Conclusion: Your Spring Nail Journey Starts Now
Spring 2025’s nail landscape rewards both minimalists and maximalists with equal enthusiasm. Whether you’re drawn to the ethereal simplicity of soap nails, the futuristic gleam of pastel chrome, or the romantic charm of 3D florals, this season offers permission to explore, experiment, and express.
The vibrant spring nail designs covered here represent more than aesthetic trends—they’re invitations to creativity, self-care rituals that punctuate busy weeks, and tiny canvases for personal storytelling. Your spring manicure might whisper sophistication in butter yellow, shout confidence in neon accents, or celebrate nature with botanical precision.
Your Next Steps:
- Choose Your Starting Point: Select one design from this guide that genuinely excites you
- Assess Your Resources: DIY or salon? What tools/time do you have?
- Start Simple: Master basics before advancing to complex techniques
- Document Your Journey: Photograph results to track improvement
- Embrace Imperfection: Every professional was once a beginner
- Share Your Creations: Tag nail artists when you’re inspired by their work
Remember that nail art requires no formal training, expensive materials, or artistic background—just curiosity, patience, and willingness to play. Your fingertips become five small opportunities for joy, color, and creative expression every time you glance down.
Spring’s renewal energy extends beyond blooming flowers and longer days. It’s permission to refresh yourself too, starting with those ten tiny canvases that travel everywhere you go.
What spring nail design will you try first? Share your plans, questions, or completed manicures in the comments below—this community celebrates every brushstroke, chrome application, and tiny painted daisy.
Welcome spring with nails as vibrant, alive, and unapologetically joyful as the season itself. Your spring nail journey starts now.
Have questions about specific techniques or need troubleshooting help? Drop a comment below and I’ll personally respond with guidance. Let’s make this your best spring nail season yet!
Pin this guide for your next manicure planning session—spring waits for no one, and neither should your nail inspiration.