How To Refresh Wavy Hair In 10 Minutes (Keep It Gorgeous For Days)

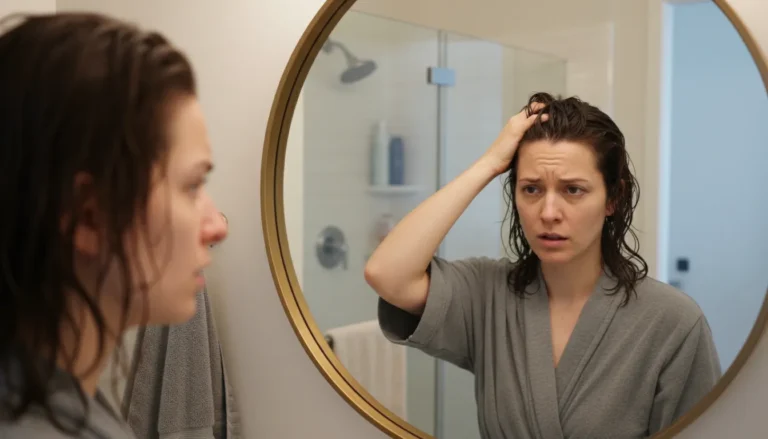
Let me tell you something about wavy hair—it’s the most amazing hair texture when it cooperates, and the most frustrating when it doesn’t. One morning you wake up with perfect beachy waves, and the next morning? Flat, frizzy chaos. Learning how to refresh wavy hair has honestly saved my sanity and probably hundreds of dollars in styling products I didn’t need.
I’ve got naturally wavy hair, and for years I struggled with that second-day (or third-day, let’s be real) slump. My waves would lose their definition, get oily at the roots, and turn into this weird in-between texture that wasn’t straight but definitely wasn’t wavy anymore. It was frustrating as hell.
But here’s the thing—you don’t need to wash your hair every single day to have gorgeous waves. In my experience, washing too often actually makes wavy hair worse. Once I figured out how to refresh wavy hair properly, I started washing only twice a week instead of every day. Game-changer.
Understanding Your Wavy Hair Type First
Before we dive into refresh techniques, you need to understand what you’re working with. Not all wavy hair is the same, and refreshing wavy hair strategies that work for fine waves won’t necessarily work for thick, coarse waves.
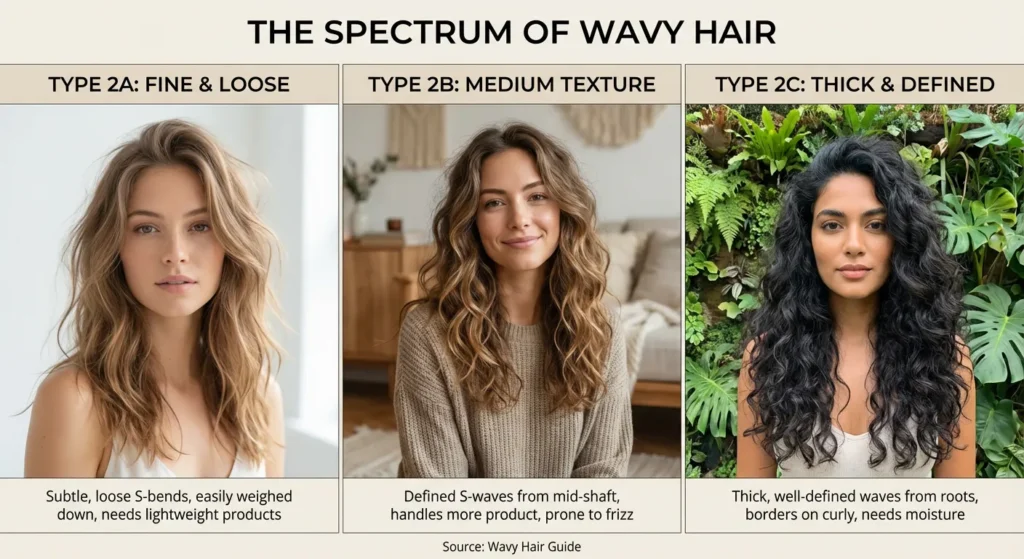
Type 2A Waves (Fine and Loose)
If you have 2A wavy hair, your waves are pretty subtle—think loose S-shaped bends rather than defined spirals. This hair type tends to get weighed down easily by heavy products and can go flat at the roots quickly.
For 2A hair, lightweight is the name of the game. You’ll want to focus on volume at the roots and avoid anything too creamy or oily.
Type 2B Waves (Medium Texture)
2B wavy hair has more defined S-shaped waves that start about halfway down the hair shaft. This is probably the most common wavy hair type, and it’s what I have. It can handle more product than 2A but still gets frizzy if you’re not careful.
Type 2C Waves (Thick and Defined)
If you’ve got 2C waves, you’re basically on the border between wavy and curly. Your waves are well-defined, start at the roots, and you probably deal with more frizz than the other types. You can handle heavier products and need more moisture.
Now here’s where it gets interesting—knowing your wave type helps you choose the right refresh method. What works for my 2B waves might be too heavy for someone with 2A hair or too light for someone with 2C waves.
The Dry Hair Refresh Method (When Your Waves Are Completely Dry)
Let’s start with the most common scenario—you wake up, and your wavy hair from yesterday looks sad and lifeless. Here’s exactly how to bring it back to life.
Step 1: Assess the Damage
Before you do anything, look at your hair honestly. Is it just flat? Frizzy? Oily at the roots? Stringy? Different problems need different solutions, so don’t just jump in with products.
I usually take a minute to separate my hair into sections and see where the problems are. Sometimes my roots are greasy but my ends are dry. Sometimes it’s all just flat. Knowing what you’re dealing with makes everything easier.
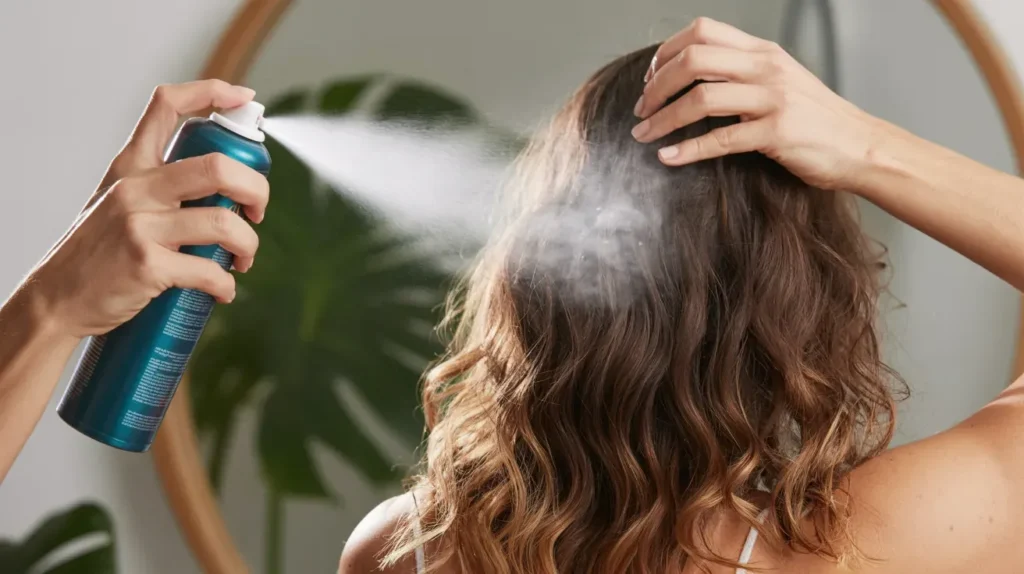
Step 2: Apply Dry Shampoo (If Needed)
If your roots are oily or limp, dry shampoo is your first step. This is non-negotiable for refreshing wavy hair on day two or three. The oil at your roots weighs everything down and makes your waves look flat and sad.
Here’s my technique: section your hair into 4-6 parts. Spray the dry shampoo directly onto your scalp (not your hair), focusing on the areas that get oiliest—usually your crown and around your face. Wait 2-3 minutes for it to absorb the oil, then massage it in with your fingertips.
Pro tip: don’t use too much. I made this mistake for years, and it just made my hair look powdery and dull. A light application that you massage in well works way better than drowning your scalp.
Step 3: Mist With Water or Leave-In Spray
Now that your roots are refreshed, it’s time to reactivate those waves. I use a spray bottle filled with water and a tiny bit of leave-in conditioner. Maybe 90% water, 10% leave-in.
Mist your hair section by section—not soaking wet, just damp enough to reactivate any product that’s still in your hair from the day before. If you used gel or mousse yesterday, this moisture will bring it back to life.
You might be wondering why not just use plain water. Honestly? You can. But adding that tiny bit of leave-in helps prevent frizz and adds a little moisture back. Your call.
Step 4: Scrunch, Scrunch, Scrunch
This is where the magic happens. Flip your head upside down (yes, really) and scrunch your damp waves with your hands. Cup sections of hair in your palm and squeeze upward toward your scalp.
The scrunching motion encourages your natural wave pattern to reform. I do this for a good 2-3 minutes, making sure I hit every section. It might feel weird at first, but trust me—this is how to refresh wavy hair without heat.
Step 5: Add a Curl Cream or Mousse (Optional)
If your waves need extra definition, work a small amount of curl cream or mousse through the damp sections. I’m talking pea-sized amounts here—wavy hair gets weighed down so easily.
My go-to is a lightweight curl cream that I emulsify between my palms and then scrunch through my waves. This gives them that defined, bouncy look without the crunch.
The Damp Hair Refresh Method (For Morning-After Waves)

Sometimes you sleep on wet or damp hair (we’ve all been there), and you wake up with hair that’s kind of wavy but also kind of a mess. Here’s how to refresh wavy hair when it’s still slightly damp.
Start With a Wave Cream
When your wavy hair is still damp, you’ve got a golden opportunity to reshape and redefine those waves. Start by applying a curl-enhancing cream while your hair is still damp.
Work it through from roots to ends, scrunching as you go. The cream gives your waves something to hold onto as they dry, preventing that stringy, undefined look.
Mist Lightly
Even though your hair is already damp, I like to give it a very light mist with my water/leave-in mixture. This helps distribute the cream evenly and adds a bit more moisture where needed.
Scrunch Upside Down
Flip your head upside down and scrunch for 2-3 minutes. With damp hair, you’ll actually see the wave pattern forming as you scrunch. It’s satisfying to watch.
Air Dry or Diffuse
Now you’ve got options. You can either let your hair air dry (which takes forever but causes zero damage) or use a diffuser on low heat. I usually diffuse because I don’t have 3 hours to wait for my hair to dry.
Heat Styling Techniques For Refreshing Wavy Hair
Look, sometimes wavy hair just needs a little heat to cooperate. I’m not talking about full-on straightening and re-curling—that defeats the whole purpose of a quick refresh. But strategic heat application? That’s fair game.
The Diffuser Method (My Favorite)
A diffuser attachment is honestly the best investment I’ve made for my wavy hair. It distributes heat evenly without disrupting your wave pattern, and it cuts drying time way down.
Here’s my technique:
- Set your dryer to low or medium heat (never high—that’s frizz city)
- Set the speed to low
- Cup sections of your waves in the diffuser bowl
- Hold for 10-20 seconds, then release
- Don’t move the diffuser around too much—let it do its job
The key is patience. Don’t rush it, and definitely don’t blast your hair with high heat just to speed things up. Low and slow wins the race here.
The Wave Iron Touch-Up
For sections that are extra flat or lost their pattern completely, a wave iron can work wonders. I use mine on just a few pieces—not my whole head—to add definition where it’s needed most.
Take 1-2 inch sections, clamp the wave iron at the root, and gently pulse it down the hair shaft. You’re not trying to create perfect uniform waves—you’re just encouraging your natural pattern.
Important: use a heat protectant spray first. Always. Heat damage is real, and wavy hair is more fragile than you think.
The Curling Iron Method (For Stubborn Pieces)
Sometimes, no matter what I do, certain sections of my wavy hair just won’t cooperate. That’s when I bring out my 1-1/4 inch curling iron.
I only use it on problem areas—usually around my face where my waves tend to fall flat. Here’s the trick: use medium heat, curl small sections, then immediately break up the curl with your fingers. You want it to blend with your natural waves, not look like distinct curls.
Let the pieces cool for 30 seconds, then gently finger-comb them to soften. This creates that effortless, lived-in wave look.
Product Recommendations For Refreshing Wavy Hair
Let me be real with you—you don’t need a ton of products to refresh wavy hair. In fact, too many products is probably what’s weighing your waves down in the first place. Here’s what actually works.
The Essential Products
Dry Shampoo: This is non-negotiable. Get a good one that doesn’t leave white residue. I’ve tried dozens, and the ones that work best absorb oil without making your hair feel dry or powdery.
Leave-In Conditioner: A lightweight leave-in that you can mix with water for refreshing. Look for something that provides moisture without weight.
Curl Cream or Mousse: Choose based on your hair type. Fine waves need mousse; thicker waves can handle cream. I use both depending on what my hair needs that day.
Heat Protectant: If you’re using any heat tools, this is essential. It creates a barrier between the heat and your hair shaft, preventing damage.
The Optional Extras
Wave Spray: Some people swear by these. They’re basically sea salt sprays that enhance texture. I use them occasionally but not every day—they can be drying.
Hair Oil: For very dry ends, a tiny amount of lightweight hair oil can help. We’re talking 1-2 drops, emulsified between your palms, applied only to the ends.
Gel: If you want more hold, a lightweight gel can help maintain wave definition. Apply to damp hair and scrunch out the crunch once it’s dry.
Common Mistakes That Ruin Your Wave Refresh
Let me tell you about all the mistakes I made when I was first learning how to refresh wavy hair. Hopefully you can learn from my failures.
Mistake #1: Using Too Much Product
This was my biggest problem. I’d layer on cream, then mousse, then spray, then gel, and wonder why my wavy hair looked weighed down and greasy. Less is more, always.
Start with a smaller amount than you think you need. You can always add more, but you can’t take it away once it’s in your hair.
Mistake #2: Touching Your Hair Too Much
I used to constantly run my fingers through my waves while they were drying, and then wonder why they were frizzy. Every time you touch drying wavy hair, you’re disrupting the wave pattern and creating frizz.
Apply your products, scrunch, and then hands off. Seriously. Step away from your hair and let it do its thing.
Mistake #3: Over-Washing
When I was washing my hair every day, my waves were a disaster. Wavy hair needs its natural oils to look good. Washing too often strips those oils, making your hair dry, frizzy, and more prone to damage.
I went from daily washing to twice a week, using refresh techniques in between. My hair has never looked better.
Mistake #4: Skipping the Dry Shampoo
Trying to refresh wavy hair with oily roots is like trying to build a house on a swampy foundation—it’s not going to work. Those greasy roots weigh everything down and make your waves fall flat.
Always address the roots first with dry shampoo before attempting to refresh the lengths.
Mistake #5: Using High Heat
I damaged my hair for years by using high heat settings on my dryer and curling iron. High heat might work faster, but it fries your hair and makes it harder to maintain waves long-term.
Stick to low or medium heat. It takes a bit longer, but your hair will thank you.
The Complete Wavy Hair Refresh Routine
Let me put this all together into a step-by-step routine you can actually follow. This is my exact process for refreshing wavy hair on day 2 or 3.
Morning Routine (10 Minutes)
Minute 1-2: Assess hair and apply dry shampoo to roots where needed. Massage it in well.
Minute 3-4: Mist hair with water/leave-in mixture until damp (not soaking wet). Section by section.
Minute 5-6: Apply a small amount of curl cream or mousse, scrunching as you go. Work upside down for better lift at the roots.
Minute 7-8: Continue scrunching to encourage wave pattern. Really focus on this step—it’s where the magic happens.
Minute 9-10: Either let air dry or start diffusing on low heat. If diffusing, cup sections in the diffuser bowl and hold for 10-20 seconds each.
Post-10 minutes: Continue diffusing if needed (another 5-10 minutes) or let air dry while you do your makeup. Touch up any flat pieces with a wave iron or curling iron if necessary.
Evening Prep (Optional)
If I know I want to extend my waves another day, I do a little prep before bed:
- Lightly mist hair with water if it’s looking dry
- Apply a tiny bit of leave-in conditioner to the ends
- Put hair in a very loose bun on top of my head (not tight—that creates dents)
- Sleep on a silk or satin pillowcase to prevent frizz
This “pineapple” method protects your waves while you sleep and makes the next day’s refresh even easier.
How Long Can You Actually Keep Refreshing Wavy Hair?
You might be wondering how many days you can stretch between washes using these refresh techniques. The honest answer? It depends.
For most people with wavy hair, you can get 2-4 days between washes using proper refresh methods. I typically go 3-4 days, refreshing on days 2 and 3, then washing on day 4.
Here’s what determines how long you can go:
Hair Thickness: Thicker hair can usually go longer because there’s more hair to absorb the natural oils from your scalp.
Oil Production: If you have an oily scalp, you might need to wash more frequently. Dry scalp? You can probably stretch it longer.
Activity Level: If you work out daily and get sweaty, you’ll need to wash more often. If you’re fairly sedentary, you can go longer.
Product Buildup: Even with refreshing, products build up over time. If your wavy hair starts feeling sticky or stiff, it’s time for a reset wash.
Pay attention to your hair. When it stops responding to refresh techniques and just looks limp no matter what you do, that’s your sign it’s time to wash.
Troubleshooting Common Wavy Hair Refresh Problems
Let me address some specific issues you might run into when learning how to refresh wavy hair.
Problem: Waves Look Stringy After Refreshing
This usually means you used too much product or your hair is too wet. Solution: use less product and make sure you’re only dampening your hair, not soaking it. Also, scrunch more vigorously to break up any clumping.
Problem: Roots Are Still Flat Even After Dry Shampoo
Try applying the dry shampoo the night before instead of in the morning. This gives it more time to absorb oil. Also, make sure you’re massaging it into your scalp really well, not just spraying and leaving it.
Problem: Ends Are Dry and Frizzy But Roots Are Oily
This is super common with wavy hair. Focus dry shampoo only on the roots, and apply a tiny amount of hair oil or leave-in conditioner only to the ends. Treat different sections of your hair differently.
Problem: Waves Fall Flat Within An Hour
You might need more hold. Try adding a lightweight gel when you refresh, scrunching it in well. Let it dry completely (creating a crunchy cast), then scrunch out the crunch for soft, defined waves that last.
Problem: Too Much Frizz After Refreshing
You’re probably either touching your hair too much while it dries, or using products with ingredients that cause frizz for your hair type. Look for products without sulfates, silicones, or drying alcohols. And seriously, hands off while drying.
Different Techniques For Different Wave Types
Remember how I said different wavy hair types need different approaches? Let me break down specific refresh techniques for each type.
For Fine 2A Waves
Focus on volume and lightweight products:
- Use dry shampoo generously at roots for lift
- Mist very lightly—too much water weighs down fine hair
- Use mousse instead of cream (it’s lighter)
- Diffuse upside down to encourage root volume
- Skip heavy oils—they’ll make your waves fall flat
For Medium 2B Waves
You have the most flexibility:
- Balance moisture and volume
- Can use either mousse or cream depending on the day
- Layer products if needed (but keep amounts small)
- Diffuse or air dry—both work well
- Can handle slightly more product than 2A hair
For Thick 2C Waves
You need moisture and frizz control:
- Use more generous amounts of curl cream
- Don’t be afraid of oils on the ends
- May need to fully wet hair for refresh rather than just dampening
- Diffuse on low heat for longer to ensure hair dries completely
- Can handle heavier products and more layers
The Science Behind Why This Works
You might be wondering why these refresh techniques actually work. Let me break down the science a bit.
Wavy hair has a unique structure. The hair shaft isn’t perfectly round like straight hair—it’s slightly elliptical. This shape creates the wave pattern, but it also means the hair cuticle doesn’t lie as flat, which leads to more frizz and dryness.
When you wash and style your hair, you’re essentially resetting this structure with moisture and products. As your hair dries over the next few days, it loses moisture and the wave pattern can fall.
Refreshing works because you’re adding back just enough moisture to reactivate your natural wave pattern and any products still in your hair, without going through the full wet-to-dry process again.
The scrunching motion physically encourages the hair to return to its wave pattern. The products provide hold to maintain that pattern. The heat (if you use it) speeds up the drying process and sets the waves in place.
Understanding this helps you make better choices about how to refresh wavy hair for your specific situation.
When To Just Wash Your Hair Instead
Look, sometimes refreshing wavy hair isn’t going to cut it. Here’s when you should just bite the bullet and wash:
- Your hair feels sticky or stiff from product buildup
- Dry shampoo isn’t absorbing the oil anymore
- Your scalp feels itchy or uncomfortable
- Waves won’t hold shape no matter what you do
- Your hair has that weird smell that happens after too many days
- You’ve got visible flakes (either from dry shampoo or scalp issues)
There’s no shame in washing your hair. These refresh techniques are meant to extend time between washes, not replace washing entirely. Listen to your hair and your scalp.
Product Combinations That Actually Work
Let me share some specific product combinations I’ve found work really well for refreshing wavy hair:
Lightweight Refresh (For Fine Waves)
- Dry shampoo at roots
- Water + leave-in spray
- Volumizing mousse
- Light diffusing
Moisture Refresh (For Dry Waves)
- Dry shampoo at roots only
- Water + leave-in spray
- Curl cream
- Hair oil on ends only
- Air dry or light diffusing
Definition Refresh (For Undefined Waves)
- Dry shampoo at roots
- Water + leave-in spray
- Curl cream + lightweight gel
- Scrunch vigorously
- Diffuse until dry, scrunch out the crunch
Quick Fix Refresh (When You’re Running Late)
- Dry shampoo
- Quick water mist
- Scrunch
- Wave iron on a few pieces around the face
- Go
My Final Thoughts On Wavy Hair Refreshing
Learning how to refresh wavy hair has completely changed my relationship with my waves. I used to see them as high-maintenance and unpredictable. Now? I love them because I know how to work with them.
The key is finding what works for YOUR hair. My 2B waves might need different products or techniques than your 2A or 2C waves. Experiment, pay attention to what your hair responds to, and don’t be afraid to adjust.
Start simple—water, dry shampoo, and scrunching. Get that down first. Then add products and techniques as needed. You don’t need a bathroom full of expensive products to have gorgeous wavy hair between washes.
And remember, some days your waves just won’t cooperate no matter what you do. That’s okay. Throw your hair in a bun and try again tomorrow. Wavy hair has a mind of its own sometimes, and that’s part of its charm.
Now go refresh those waves and save yourself some time, money, and damage from over-washing. Your hair will thank you.
Frequently Asked Questions About Refreshing Wavy Hair
Q: Can I refresh wavy hair by just wetting it with water? You can, but it won’t give you great results. Water alone will reactivate your wave pattern temporarily, but without any product, your waves will likely look undefined and stringy. It’s better to mix a bit of leave-in conditioner with your water or apply a curl cream after wetting.
Q: How often should I wash wavy hair? Most people with wavy hair do best washing 2-3 times per week, using refresh techniques on the in-between days. Pay attention to when your hair stops responding to refresh methods—that’s when it’s time to wash.
Q: Is it better to refresh wavy hair in the morning or at night? Morning refreshing works better for most people because you can see what you’re working with and have time for products to dry. However, some people prefer to refresh lightly at night and sleep in a protective style, then do a quick refresh in the morning.
Q: Can I use dry shampoo every day between washes? You can, but I don’t recommend it. Dry shampoo buildup can make your scalp itchy and your hair dull. Try to limit it to 1-2 times between washes, applying it the night before for best absorption.
Q: Why do my waves look good when wet but fall flat when dry? This usually means you need more hold. Try adding a gel or mousse while your hair is still damp during your refresh. Also, make sure you’re scrunching enough and allowing your hair to dry completely before touching it.
Q: Should I brush wavy hair when refreshing it? Generally no—brushing disrupts the wave pattern and creates frizz. If you absolutely must detangle, use a wide-tooth comb on dry hair before you start the refresh process, or use your fingers to gently separate any tangles.
Q: Can I straighten sections and leave others wavy? You can, but it’s risky. The texture difference might look intentional and cool, or it might just look like you gave up halfway through styling. If you’re going to do this, make sure the straight sections are very smooth and sleek so it looks purposeful.