Cherry Nail Ideas: 30+ Sweet Designs You Need to Try in 2025

Look, I’m just gonna say it—cherry nail ideas are having a major moment right now, and honestly? I’m not mad about it. There’s something about those tiny red fruits dancing across your fingertips that just feels right. It’s playful without being childish, retro without feeling outdated, and surprisingly versatile.
I’ve been watching this trend explode all over social media (thanks, Hailey Bieber), and what I love most is how accessible it is. Whether you’re a complete nail art newbie or someone who can freehand intricate designs in your sleep, there’s a cherry nail design that’ll work for you.
So buckle up, because we’re diving deep into everything cherry nails—from the easiest DIY methods to show-stopping designs that’ll have everyone asking where you got your mani done.
Why Cherry Nails Are Taking Over in 2025
Before we jump into the designs, let’s talk about why cherry nail art has become the trend to try. Unlike some of those ultra-minimalist looks we’ve been seeing (milky nails, I’m looking at you), cherry nails bring personality and fun back to your manicure.
The appeal goes beyond just aesthetics. Cherries symbolize sweetness, youth, and that carefree summer vibe we’re all chasing. Plus, they tap into that nostalgic Y2K energy that’s been dominating fashion lately—think pin-up girls, vintage diners, and that perfect mix of feminine and edgy.
What’s really cool is that cherry nails work across all seasons. Sure, they’re perfect for summer picnics, but throw them on a dark burgundy base for fall, and suddenly you’ve got a sophisticated seasonal look. The versatility is unmatched.
Essential Tools for DIY Cherry Nail Designs
Now here’s where it gets interesting—creating cherry nail ideas at home isn’t nearly as hard as you’d think. You don’t need a salon or crazy expensive equipment. Let me break down exactly what you’ll need:
Must-Have Tools:
- Nail dotting tools (various sizes) – These are your best friends for creating perfectly round cherries. Just dip, press, and you’re done
- Fine nail art brushes – For those delicate green stems and tiny details
- Base coat and top coat – Non-negotiable if you want your design to last
- Red nail polish (classic cherry red or deep burgundy)
- Green nail polish (for stems and leaves)
- White polish (for highlights that make cherries pop)
- Bobby pins (if you don’t have dotting tools—they work surprisingly well!)
Optional but Awesome:
- Nail stickers or decals (for when you’re feeling lazy)
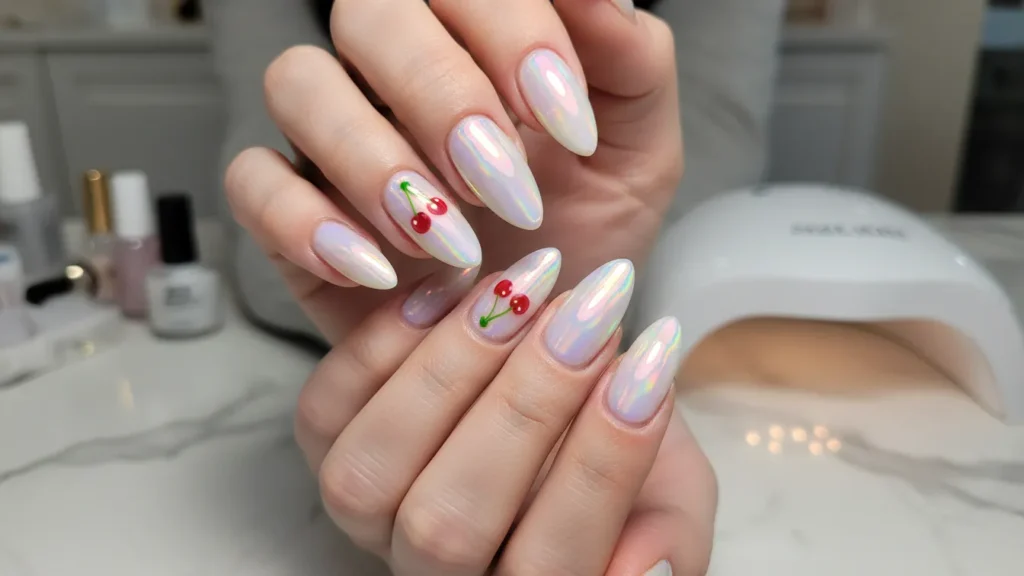
- Rhinestones or gems (because sparkle never hurt anyone)
- Matte or glossy top coat options
- UV/LED lamp (if you’re working with gel polish)
The beauty of cherry nail designs is that you can start super simple. Two red dots and a green stem? That’s a cherry. Done. As you get more confident, you can add highlights, shadows, leaves, and all sorts of fancy details.
Step-by-Step Tutorial: Classic Cherry Nails
Let me walk you through creating the most basic (but adorable) cherry nails. This is the foundation you’ll build on for fancier designs later.
Step 1: Prep Your Canvas
Start with clean, filed nails. Push back those cuticles and buff your nail surface lightly. This isn’t just fussy salon talk—proper prep makes your manicure last way longer.
Step 2: Apply Your Base
Paint on your base color. For classic cherry nail art, go with:
- Soft nude or pink (most popular)
- Sheer white (very French-girl chic)
- Baby blue (unexpectedly cute)
- Even black for an edgy vibe
Let it dry completely. I mean completely. Wait an extra minute. Trust me on this.
Step 3: Create Your Cherries
Here’s the fun part. Dip your dotting tool (or bobby pin end) into red polish. Press it onto your nail to create two circles side by side—these are your cherries. Space them close enough that they look connected but not so close they blob together.
Pro tip: Different sized dotting tools give you different sized cherries. Mix and match for a more organic look.
Step 4: Add the Stems
Using your finest brush and green polish, draw a thin line from each cherry upward, connecting them at the top in a gentle V-shape. Don’t stress about perfection—slightly wonky stems actually look more natural.
Step 5: Optional Details
Want to level up? Add a tiny white dot on each cherry for that glossy highlight effect. Or paint tiny green leaves at the stem’s base. These little touches make a huge difference.
Step 6: Seal the Deal
Apply a glossy top coat over everything. This protects your design and makes those cherries look good enough to eat.
Total time? About 30 minutes including drying. Not bad for a custom manicure, right?
30+ Cherry Nail Ideas You Need to Try
Alright, let’s get into the good stuff. I’ve rounded up cherry nail designs for every vibe, skill level, and occasion. Whether you want subtle or statement, there’s something here for you.
Minimalist Cherry Designs
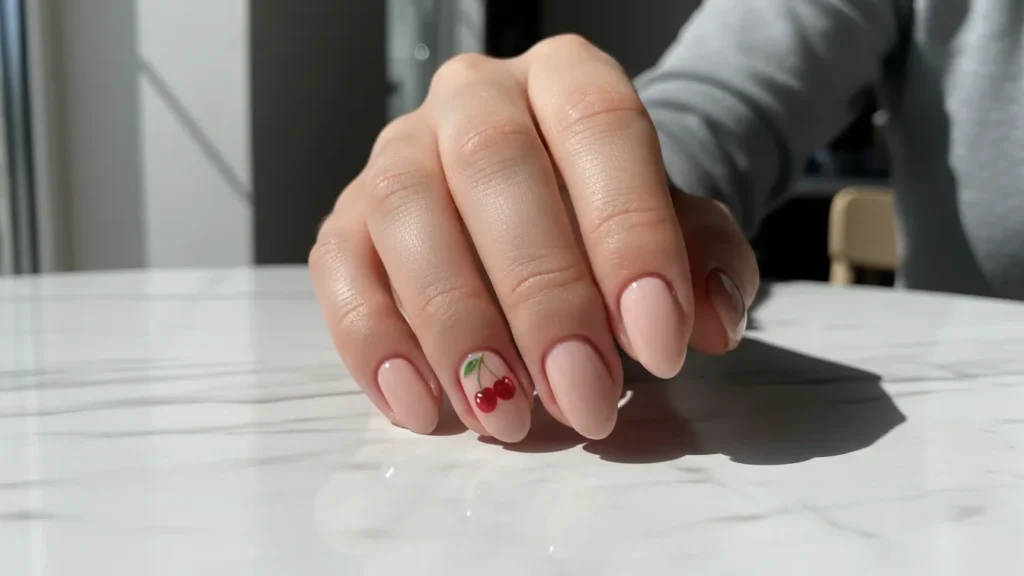
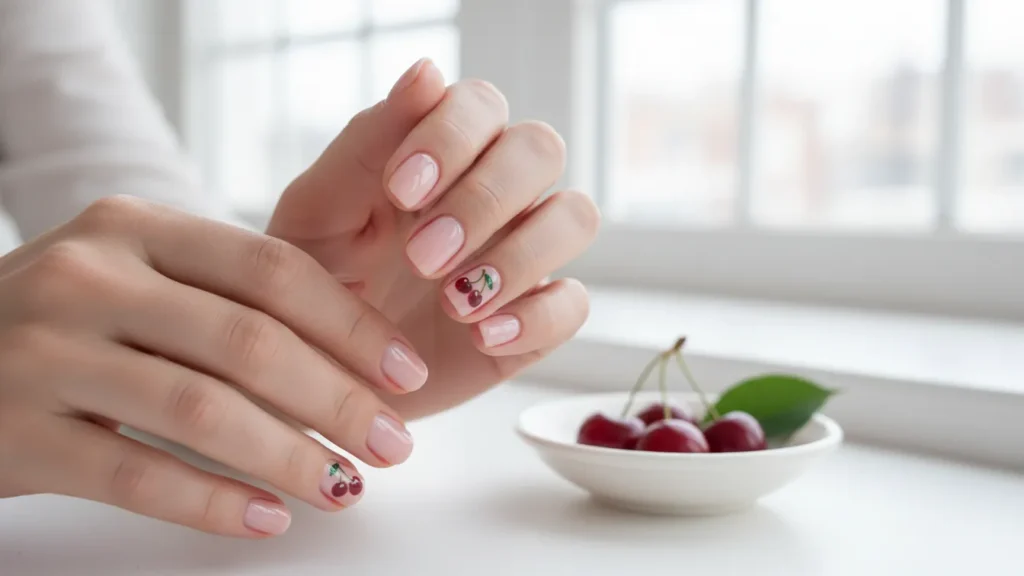
1. Single Cherry Accent
Keep it simple with one statement cherry on your ring finger and leave the rest a clean nude or soft pink. This look gives you that cherry vibe without feeling loud, so it’s perfect for everyday wear. If you want it to look extra “salon-ish,” add a tiny white highlight dot on each cherry. On short nails, place the cherry closer to the cuticle so the design doesn’t feel cramped. Finish with a glossy top coat so the cherry looks juicy and fresh.
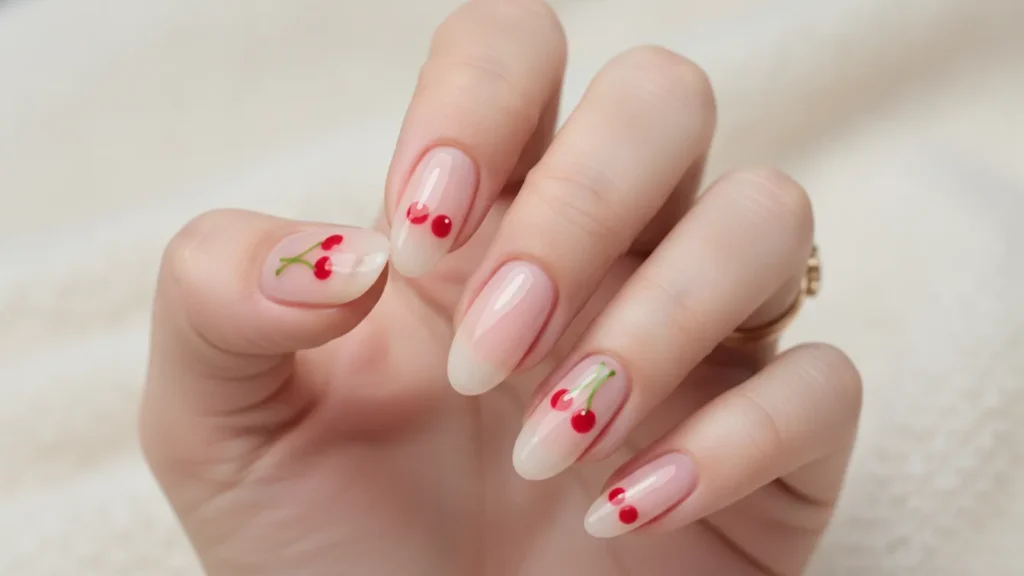
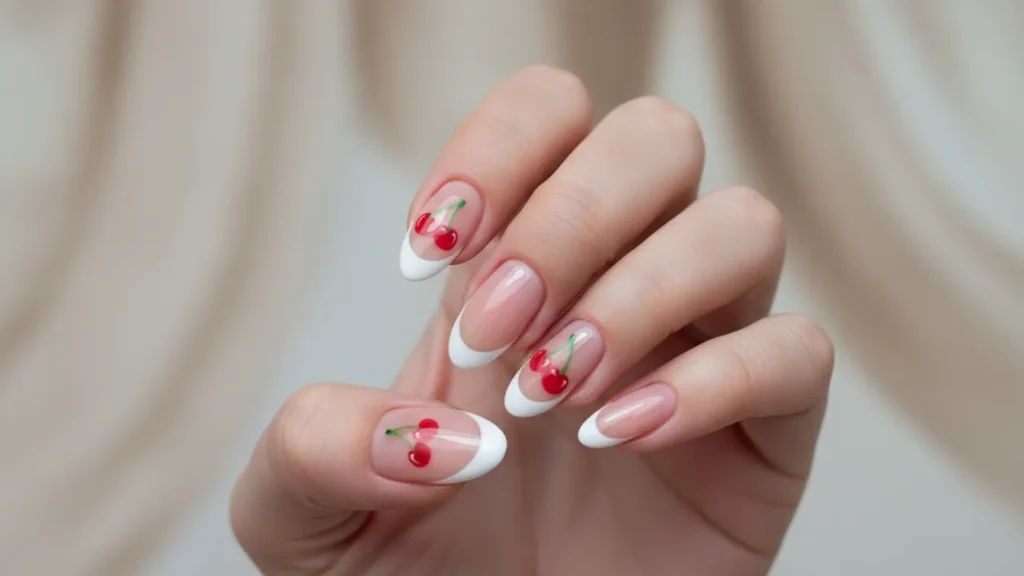
2. Micro Cherry French Tips
Classic French tips get a cute upgrade with one tiny cherry placed near the base of the nail. The small size is what makes it feel classy, not cartoonish, and it works in literally any setting. If your tips are thin and crisp, the cherry will pop even more without stealing the spotlight. You can do just one accent nail or repeat the micro cherry on two nails for balance. This is also a great “beginner” option because you only need two dots and a simple stem.
3. Negative Space Cherries
Leave most of the nail bare or sheer and add a small cherry detail as the main focus. It looks modern and clean, like you’re doing nail art but in a low-key way. The best part is it grows out nicely because the base is natural-looking. Keep the cherries small and slightly off-center so the design feels intentional. A high-shine top coat makes the negative space look polished rather than unfinished.
4. Cherry Dot Accents
Instead of full cherries, scatter tiny red dots on one or two nails for a “hint” of cherry. Then add a nail with just green stem strokes or tiny leaves to tie the theme together. It’s playful but still minimal, and it gives that deconstructed nail-art vibe. You can mix dot sizes so it looks more organic and less patterned. This one’s perfect when you want something cute but don’t have time for full detail work.
Bold & Playful Cherry Nails
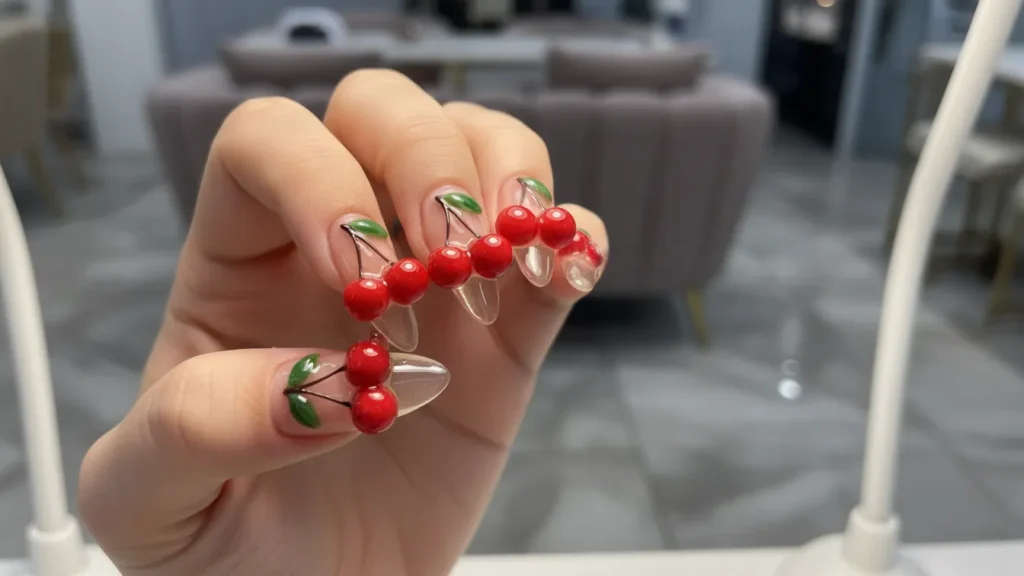
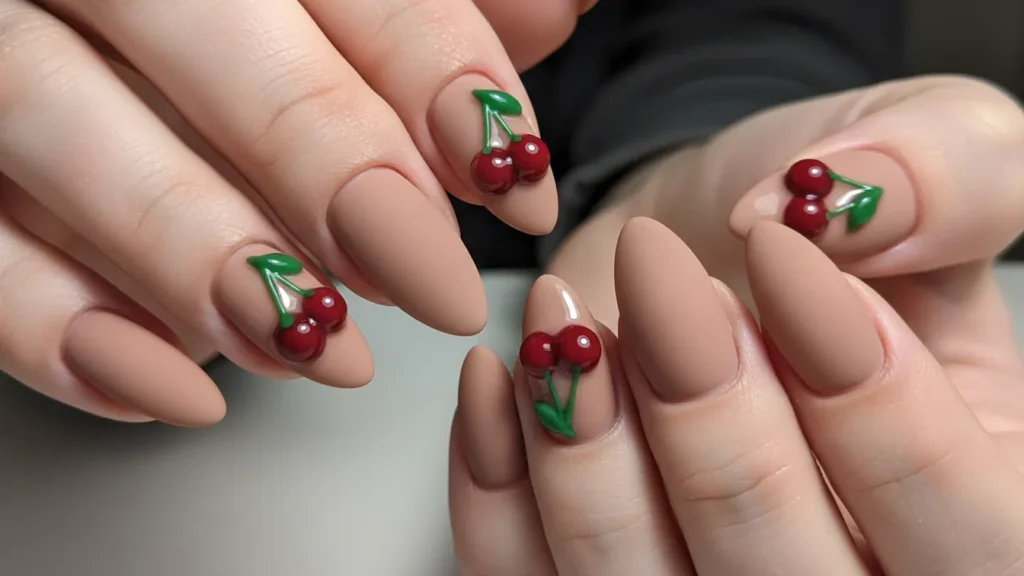
5. 3D Cherry Explosion
This design is a total showstopper because the cherries literally sit raised on your nails. It looks like candy art, especially when the surface is glossy and rounded. If you’re doing it at home, you’ll usually need builder gel or acrylic to create that pop effect. Keep the base simple (nude, milky pink, or clear) so the 3D cherries don’t feel overwhelming. It’s best for events because it’s bold, fun, and definitely not subtle.
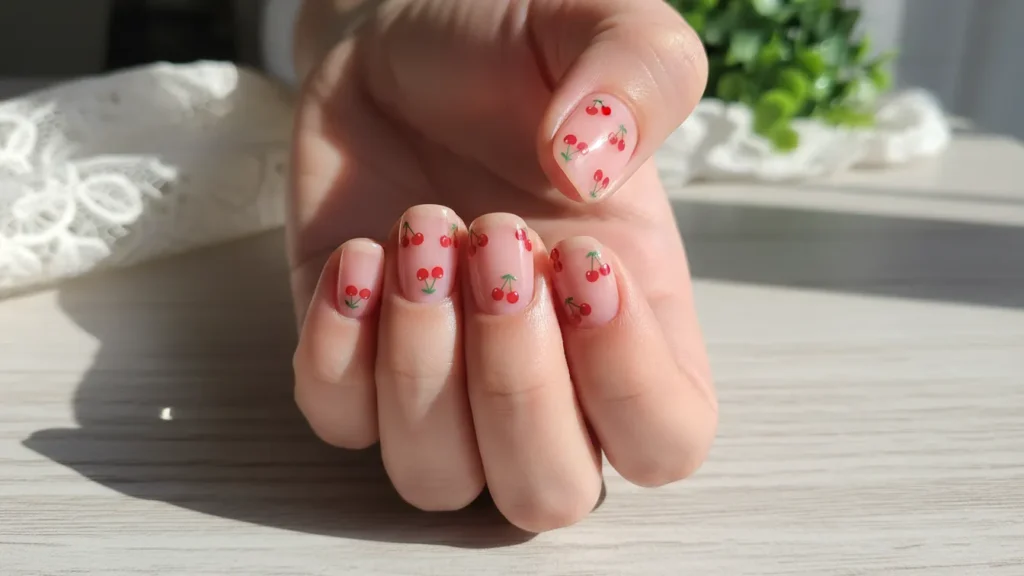
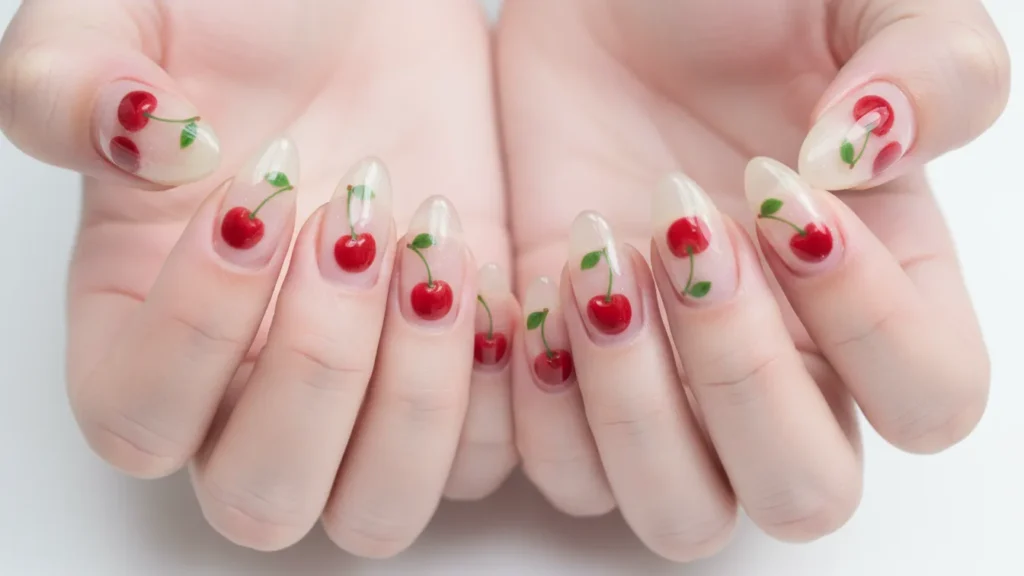
6. All-Over Cherry Print
Cover every nail with tiny repeating cherries on a clear or light base for that cute “wallpaper” effect. It gives big retro vibes and looks adorable on both short and long nails. The key is spacing—don’t crowd them, or it’ll start looking messy. If painting feels too slow, you can mix painted cherries with a few cherry stickers to save time. Seal well with top coat so the small details don’t chip quickly.
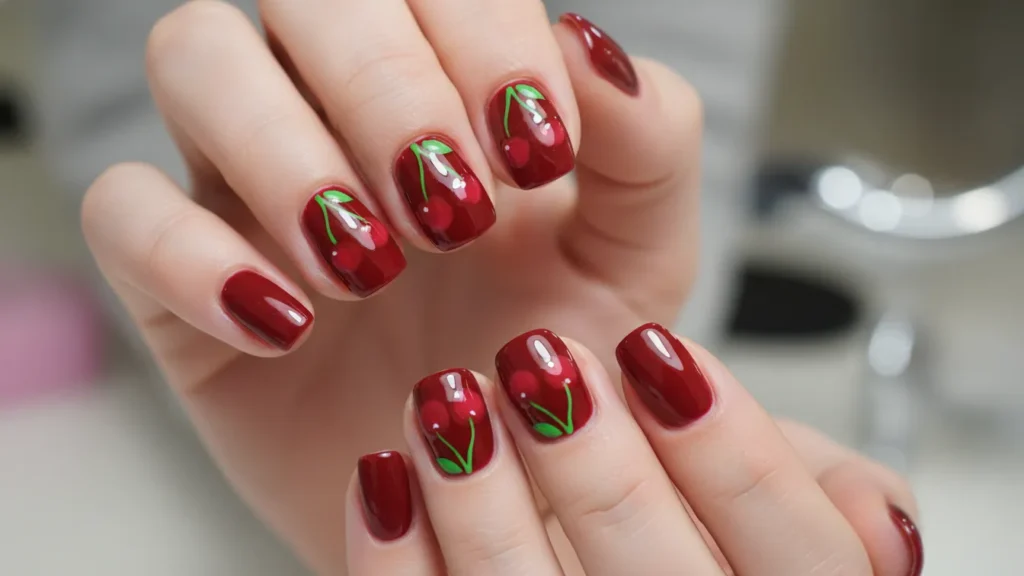
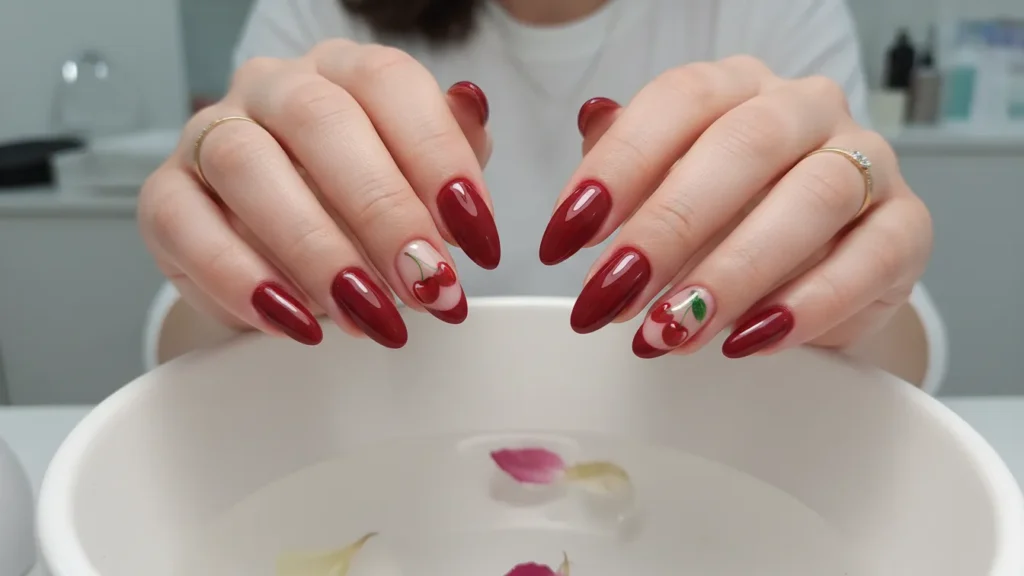
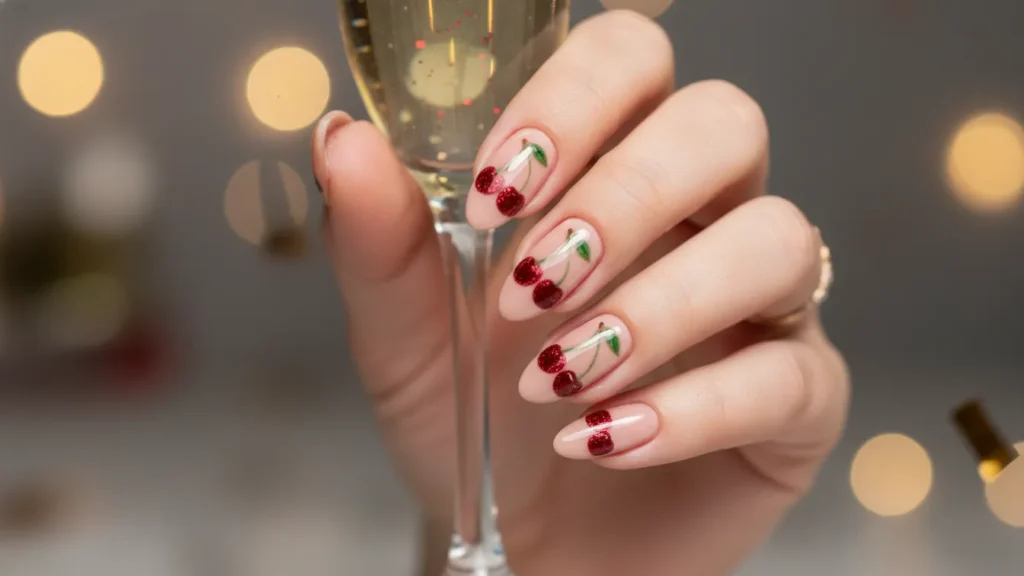
7. Glossy Cherry Bomb
Go for bold red cherries with bright green stems over a nude base, then make it extra shiny with a glossy top coat. The shine is what makes this style feel like a vintage sticker book—super cute and eye-catching. Keep the cherry shapes clean and round, then add a little white highlight for that “juicy” look. If you want it even bolder, add a single red nail in between the cherry nails. This design photographs insanely well in daylight.
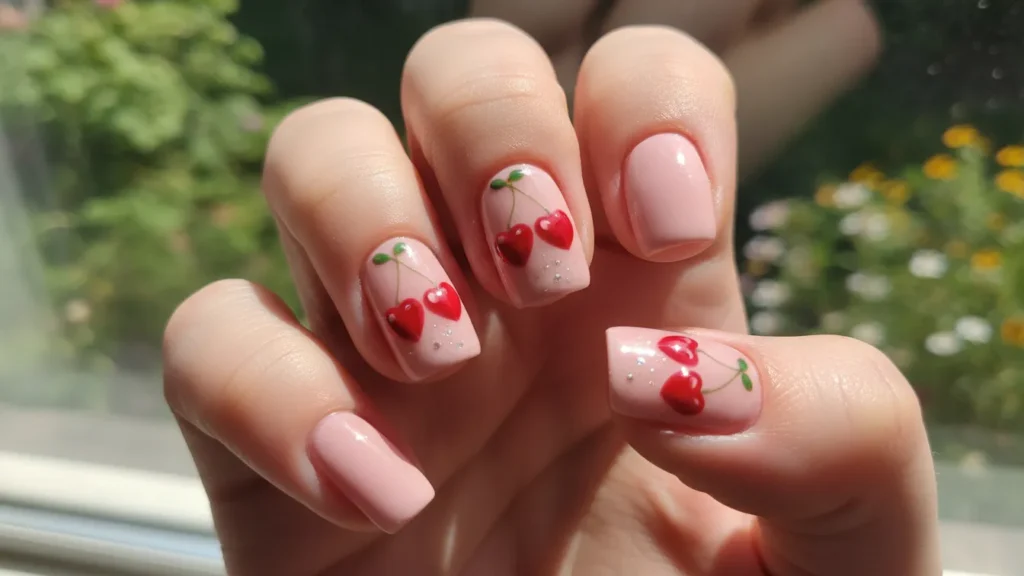
8. Heart-Shaped Cherries
Swap the usual round cherry dots for tiny heart shapes, and suddenly the design feels flirty and romantic. It’s still cherry-themed, but it adds a Valentine-ish twist without being too obvious. Use a fine brush to shape the heart, then connect the stems in a soft V-shape. This looks best on a soft pink or sheer nude base to keep it delicate. Add micro glitter on just one accent nail if you want extra charm.
Cherry Nails with French Tips
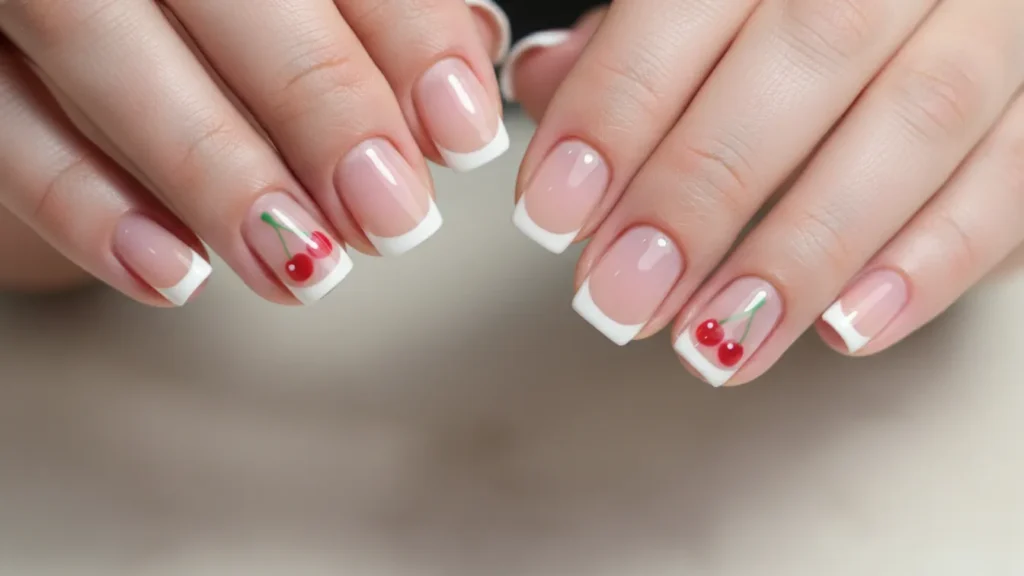
9. Classic White French + Cherries
This one is timeless: crisp white tips with small cherry designs placed near the cuticle. The French tip keeps it clean and elegant, while the cherries add a fun surprise. Keep the cherries tiny so the look stays classy, not busy. If you want a balanced set, do cherries on two nails (like ring + middle) instead of every nail. A glossy finish makes the French tips look extra fresh and sharp.

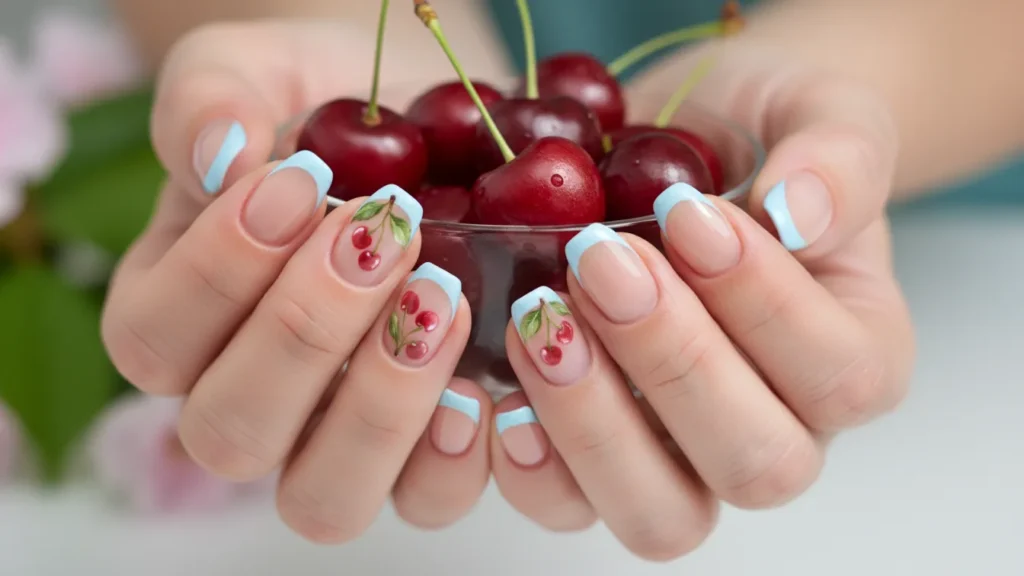
10. Colored French Cherry Combo
Switch your French tips to a soft color like baby blue, mint, or pastel pink, then add cherries to complement. The contrast makes the cherry design pop more than on a plain nude base. Pastel tips also make the whole set feel more “spring/summer picnic” even if it’s any season. Keep your cherry reds classic so they stand out against the colored edge. This is a great choice if you want something fun but still polished.
11. Red Cherry French Tips
Do your French tips in cherry red, then add actual cherry designs on one or two accent nails. It’s a clever “theme-on-theme” look that feels coordinated without being repetitive. Pairing red tips with nude bases also makes your nails look longer and cleaner. For the accent nail, paint classic cherries with green stems so it’s clearly intentional. This is perfect when you want bold color but still want a neat, structured look.
12. Outlined French with Cherries
Instead of solid French tips, outline the tip shape with a thin white or black line. Then place cherry art in the negative space area so it looks modern and graphic. This style feels trendy and fashion-forward, especially on almond or coffin nails. Keep the outline clean, because that crisp edge is what makes the design look expensive. Add one tiny leaf detail to complete the cherry look without clutter.
Seasonal Cherry Variations
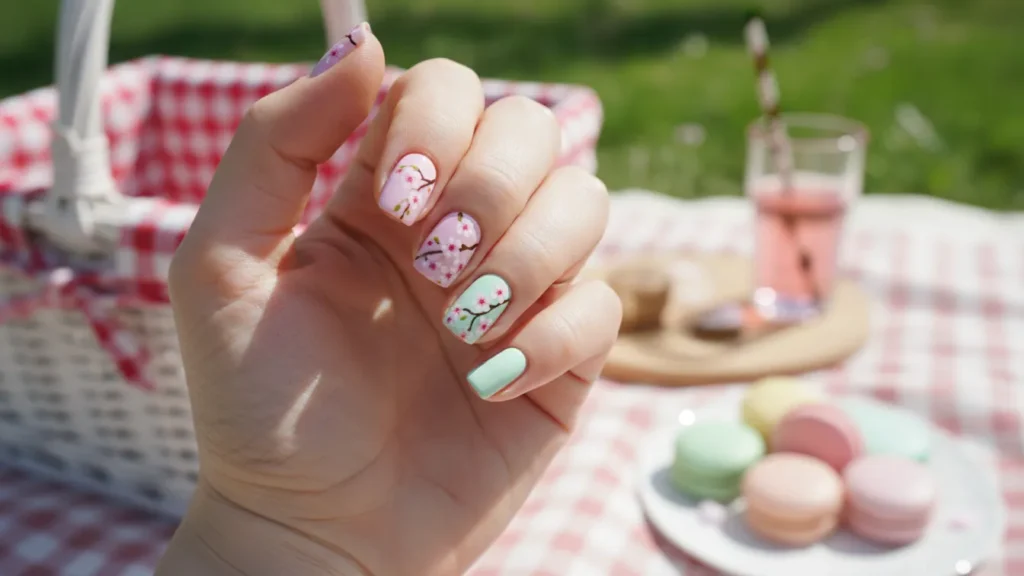
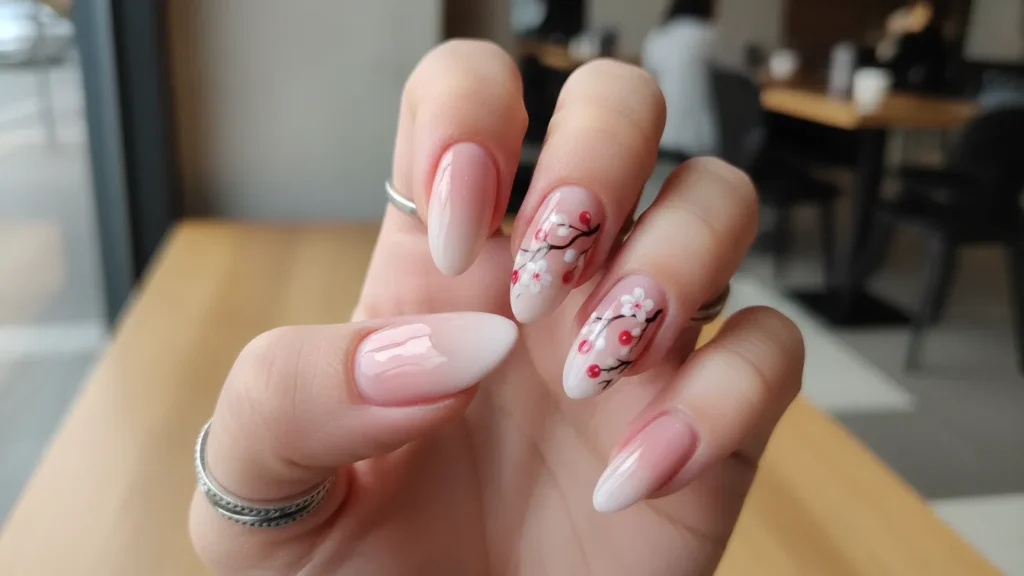
13. Pastel Cherry Spring Vibes
Use soft pastel bases like pink, mint, or milky white, then add delicate cherry details. This gives “spring picnic” energy instantly, especially if you keep the cherries small and airy. You can even add a hint of cherry blossom branch detail on one accent nail if you’re feeling artsy. The pastel background makes the red cherries look extra sweet and poppy. Finish glossy for a fresh, glassy look.
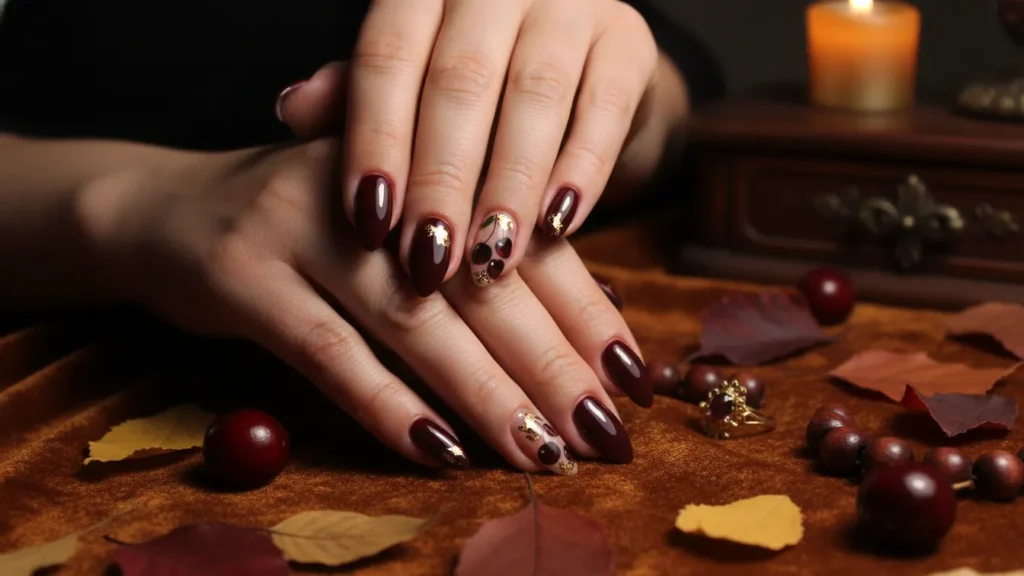
14. Dark Cherry Fall Edition
Go for a deep burgundy or wine base and add darker cherry designs to match. This makes the cherry theme feel grown-up and perfect for fall. Gold accents (thin lines, tiny dots, or micro foil) can make it feel luxe and seasonal. Keep stems a muted green or even metallic gold so they blend with the richer palette. This is the cherry look for someone who wants cute but not “too cute.”
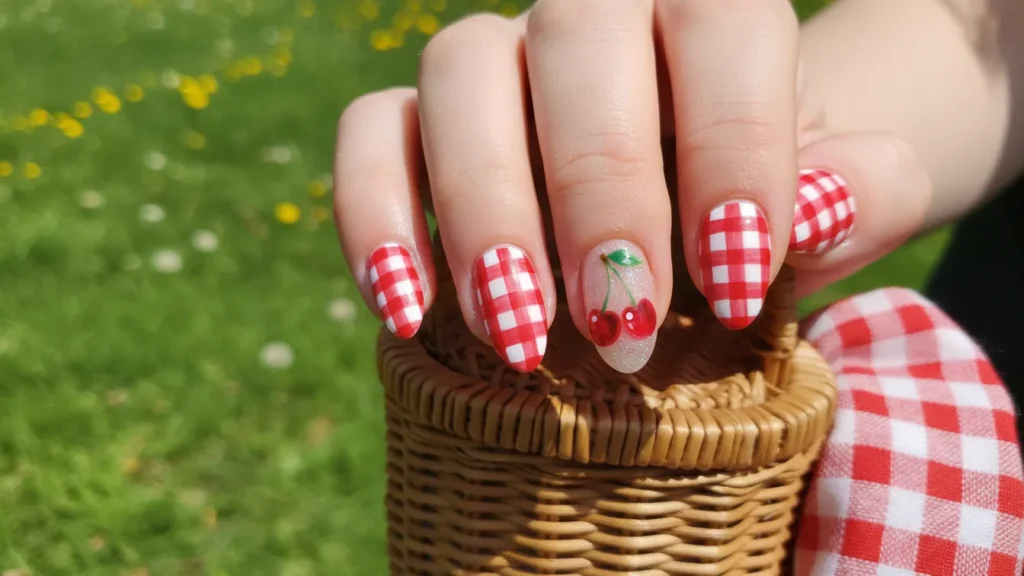
15. Cherry + Gingham Picnic Nails
Pair cherry art with red-and-white or pink-and-white gingham patterns for full picnic vibes. It feels playful, retro, and super summery, like a cute dress turned into nail art. To avoid visual chaos, do gingham on 2–3 nails and cherries on the others. A nude base under the gingham can keep it from looking too harsh. This is honestly a BBQ, brunch, and vacation manicure all in one.
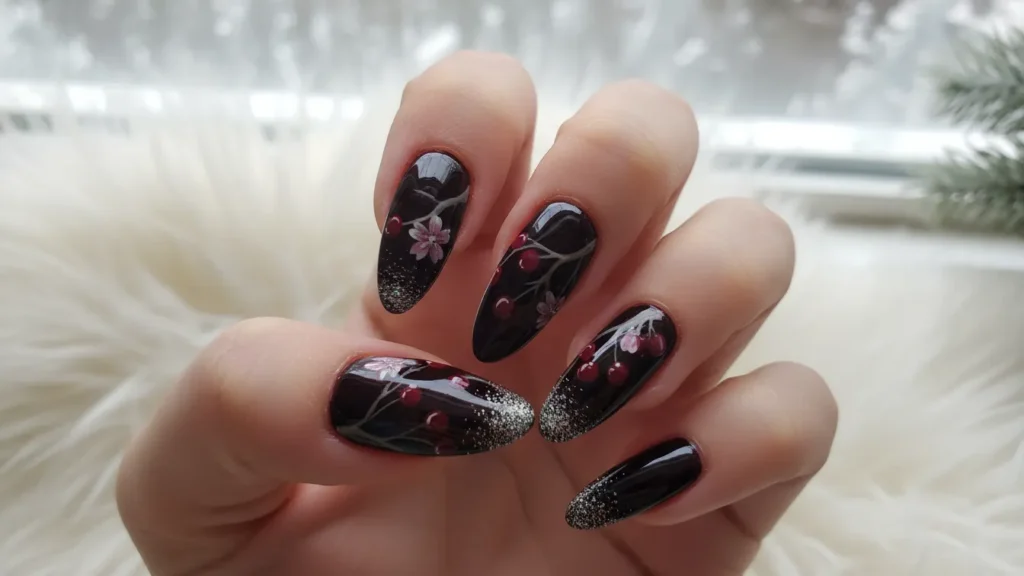
16. Black Cherry Winter Glam
Use black or deep plum as your base, then add cherry designs for dramatic contrast. This looks bold and chic, especially when you add chrome, silver glitter, or a frosty shimmer top coat. The dark base makes the red cherries look richer and more intense. Keep the cherry highlights crisp so they don’t get lost against the dark background. It’s a great winter version that still feels fun.
Chrome & Glitter Cherry Designs
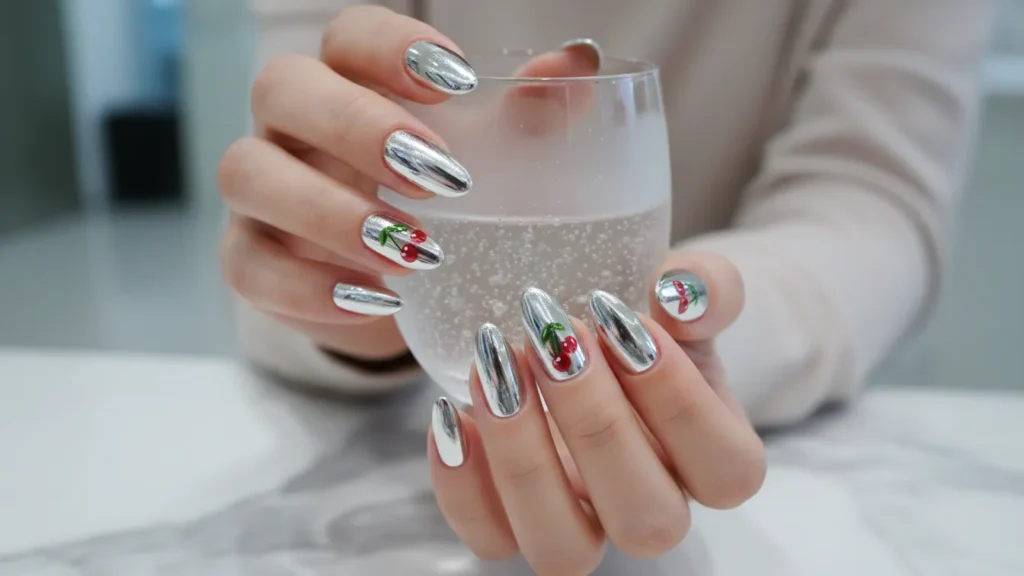
17. Chrome Cherry Nails
Start with a chrome base like silver, rose gold, or pearl, then paint cherries on top. The mix of futuristic shine and retro fruit art is weirdly perfect together. Keep the cherry design simple so the chrome still gets its moment. A thin stem and tiny leaf detail is enough to make it look complete. This set is ideal for parties because it catches light like crazy.
18. Glitter Accent Cherries
Paint your cherries using glitter red polish, or add glitter French tips with classic cherry accents. Glitter makes the cherries look like candy, and it instantly upgrades the set. If full glitter cherries feel too much, do normal cherries and add glitter only as a background accent. Keep the rest of the nails neutral so the sparkle doesn’t overwhelm the design. This one is basically “cute, but make it glam.”
19. Metallic Stem Details
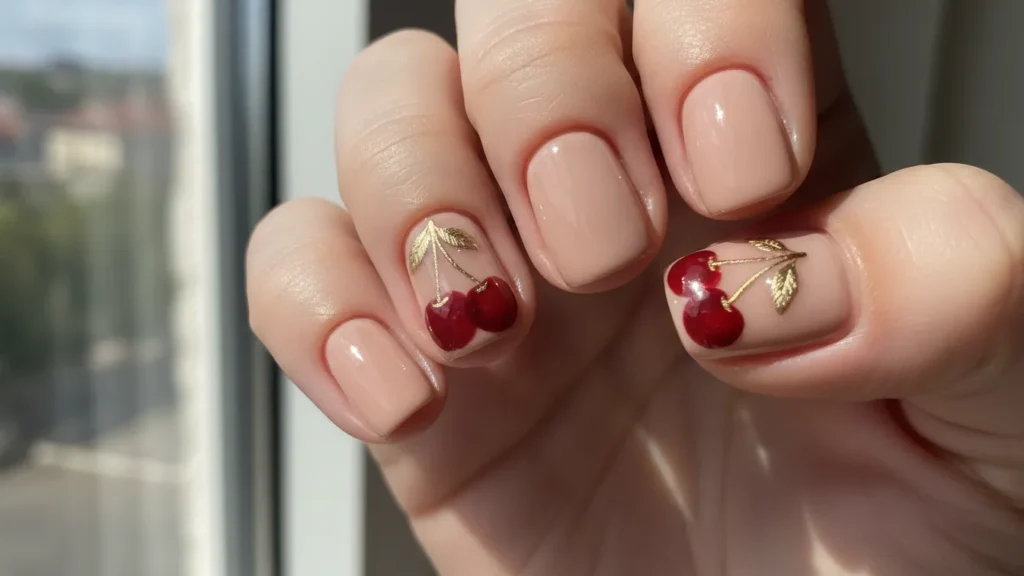
Use classic red cherries, but swap the stems and leaves into gold or silver metallic polish. That tiny metallic touch makes the whole look feel more high-end. It’s subtle enough for everyday but still looks special up close. Metallic stems also photograph beautifully because they reflect light. Pair it with a nude base for elegance or a milky base for a softer vibe.
20. Holographic Cherry Magic
Add holographic polish as a base or as a top coat over a neutral color, then paint cherries on top. The rainbow shift makes the design look dreamy and a little magical. Keep your cherry reds opaque so they don’t disappear under the holo effect. This style looks especially pretty on almond nails because the curve shows off the shimmer. It’s a fun twist when you want cherries but not the standard look.
Mix & Match Cherry Patterns
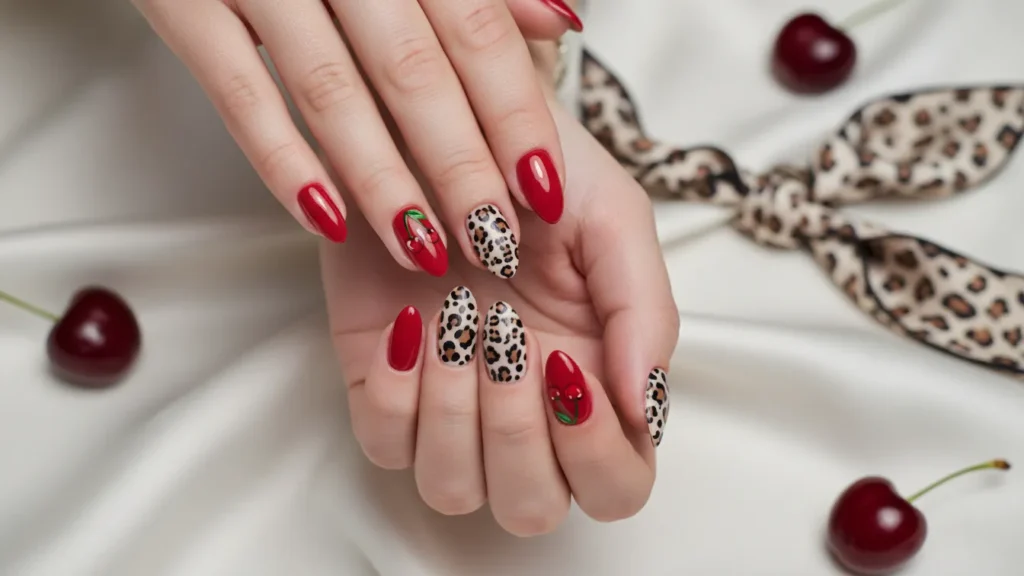
21. Cherry + Leopard Print
Mix cherry designs with leopard print nails for a bold, playful set. The contrast works because both designs feel retro and confident, just in different ways. Keep a consistent color story—like red cherries + neutral leopard tones—so it doesn’t look random. Do leopard on 2–3 nails and cherries on the rest to keep it balanced. This one screams “Instagram manicure” in the best way.
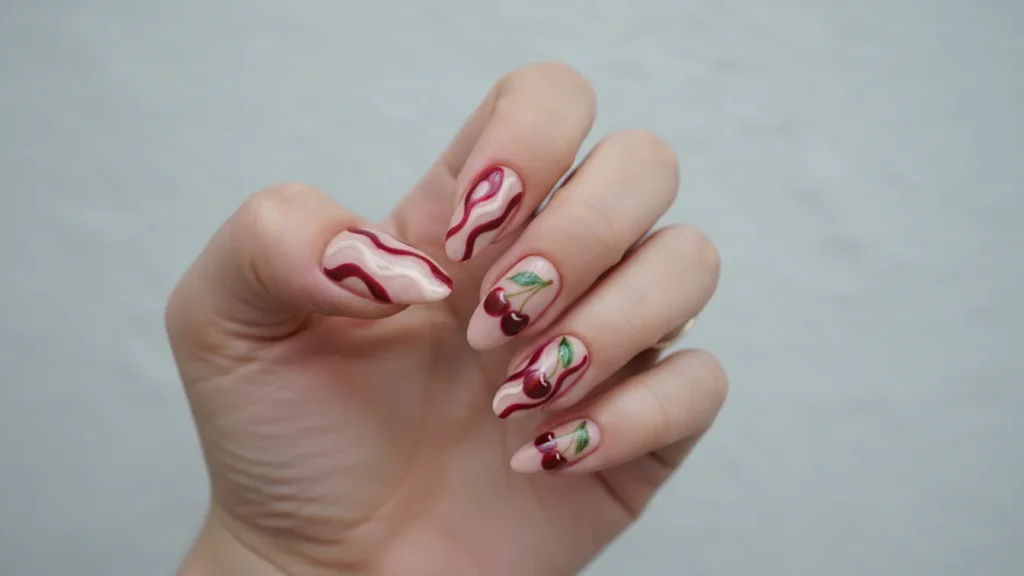
22. Cherry + Swirls
Pair cherry nails with abstract swirl or marble patterns for a cool contrast. The swirls add movement and a trendy feel, while the cherries keep it cute and recognizable. Choose swirl colors that match your cherry palette—nude, red, pink, or even mint. This design looks best when you alternate nails so each style gets breathing room. It’s artsy without losing the playful theme.
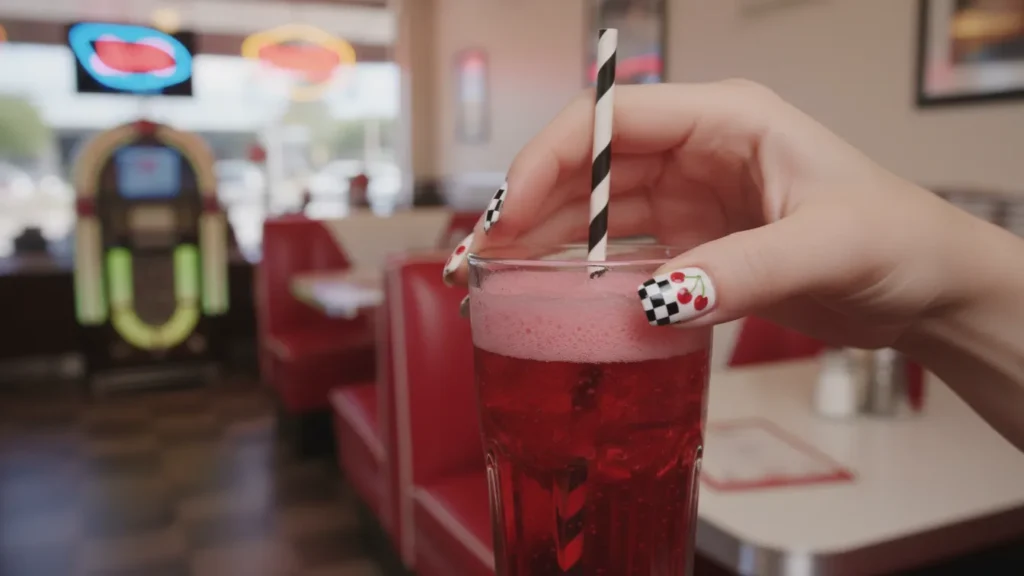
23. Cherry + Checkerboard
Combine black-and-white checkerboard nails with cherry accents for that ‘50s diner vibe. It feels graphic, edgy, and still cute, which is a fun mix. Keep cherry nails simple so the checkerboard doesn’t fight for attention. If you want it softer, try a pastel checkerboard instead of stark black-and-white. This is the kind of set people compliment instantly because it’s so recognizable.
24. Cherry + Florals
Mix cherry designs with small floral patterns for a sweet, garden-party look. The cherries give playful energy, while the florals make it feel delicate and feminine. Use similar brushstroke sizes so the two designs feel like they belong together. A soft pink or milky nude base ties everything nicely. This one is perfect for spring weddings, brunch, and any “pretty” occasion.
Advanced Cherry Techniques
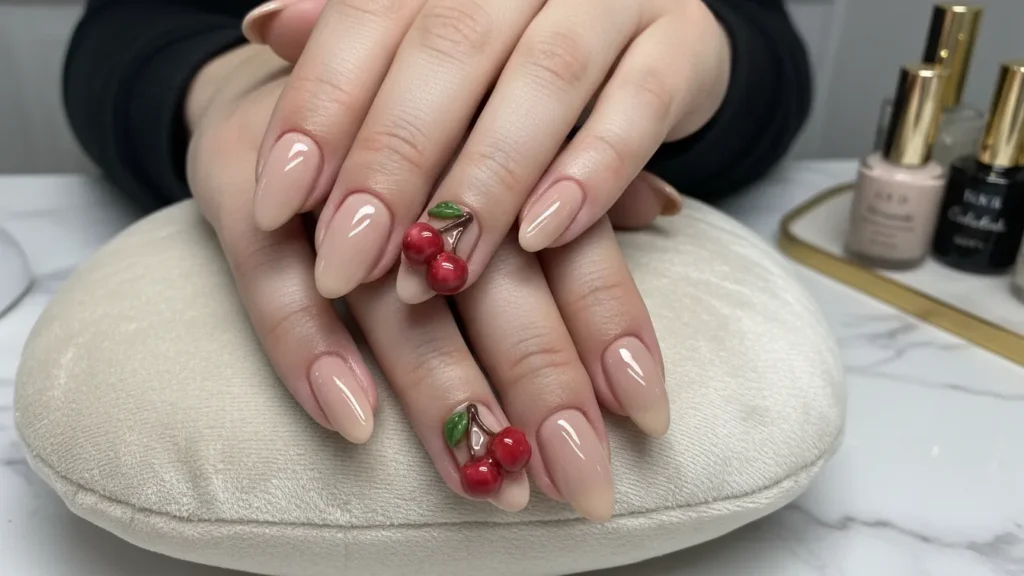
25. Realistic 3D Cherries
These are next-level because they’re shaped, shaded, and glossy—almost like tiny real cherries on your nails. Usually, builder gel or acrylic is used to create the rounded fruit shape and dimension. Shading (a darker red near the edges) and highlights (white reflective dots) make it look insanely realistic. Keep the base minimal so the 3D art is the main attraction. If you’re doing this at a salon, ask for a smooth top coat so the cherries look glassy, not bumpy.
26. Jelly Cherry Nails
Use a translucent jelly base so it looks like the cherries are floating inside the nail. This gives that “encapsulated” effect that’s super trendy right now. You can keep the base pinkish-red like cherry candy, or go clear for a fresh look. The cherries look extra cute when they’re small and spaced, like little fruits suspended in gel. Finish glossy to keep the jelly vibe looking clean and juicy.
27. Textured Cherry Art
Mix finishes to make the design feel more interesting—like matte background with glossy cherries. You can also add velvet powder, sugar effect, or subtle texture on accent nails for a more tactile look. The contrast makes the cherries pop even when the design is simple. Stick to one texture technique so it doesn’t feel chaotic. This style is great if you want something unique without adding extra colors.
28. Gradient Cherry Ombre
Create an ombre base (like nude to pink, or pink to red) and add cherries that match the gradient. The color transition makes the whole manicure look softer and more blended. Keep cherry placement strategic—two nails with cherries, the rest just the ombre—so it doesn’t look too busy. This one takes a little practice, but it looks super “pro” once done right. It’s also a gorgeous option for longer nails because the gradient has space to show.
Fun & Quirky Cherry Ideas
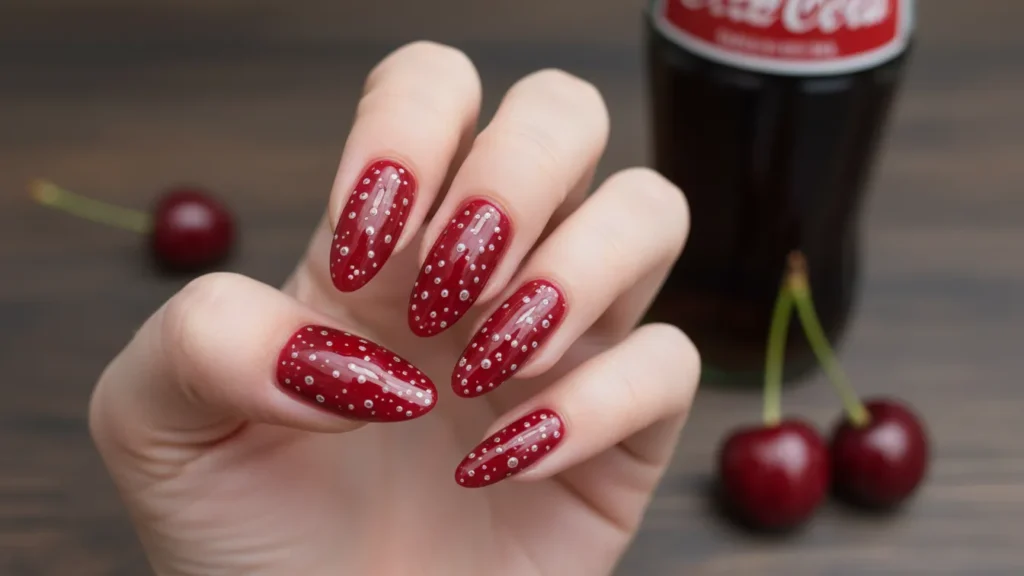
29. Cherry Cola Nails
Use a deep cherry red base that looks like cherry cola, then add tiny bubble effects with white dots. It’s subtle, themed, and different from the usual nude cherry look. You can add a faint shimmer top coat to mimic that fizzy, glossy soda shine. If you want more obvious “cola” vibes, add a thin caramel/brown swirl accent nail. It’s quirky but still wearable.
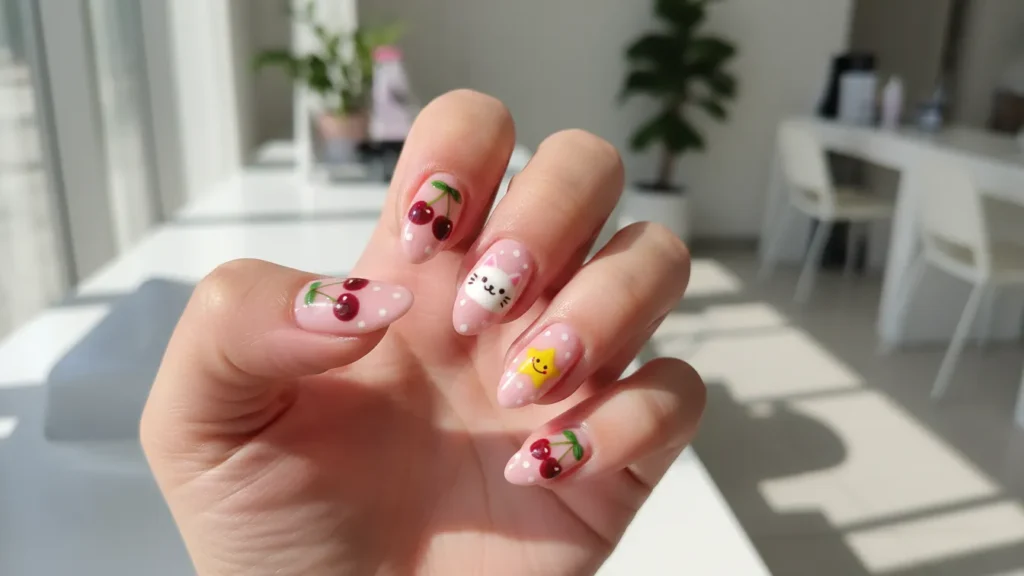
30. Cherry + Character Mix
Mix cherries with cute characters like Hello Kitty, smiley faces, or tiny hearts for a playful, maximalist set. The trick is keeping a consistent palette so the characters don’t feel random next to the cherries. Choose just one character theme and repeat it on 1–2 nails while the rest stay cherry-focused. This is perfect for vacations, birthdays, or when you just want fun nails that don’t take themselves seriously. Add glossy top coat so everything looks bright and clean.
Cherry Nail Designs for Different Nail Lengths
You might be wondering how cherry nail ideas translate across different nail lengths. Let me break it down because length totally matters for design placement.
Short Nails:
Here’s the thing about cherry nails on short nails—they can actually look even cuter than on long nails. I know that sounds counterintuitive, but hear me out.
With shorter nails, you want to keep your cherry designs smaller and more spaced out. One or two cherries per nail max. Place them toward the cuticle area or off to one side rather than dead center. This creates visual interest without overwhelming the limited real estate.
My favorite short nail cherry look? Single cherry on the ring finger, solid color everywhere else. Clean, cute, and doesn’t make your nails look cluttered.
Medium Length Nails:
This is the sweet spot (pun intended) for cherry nail designs. You’ve got enough space to play with multiple cherries per nail or mix different design elements.
Try alternating—cherries on thumb and ring finger, solid color or French tips on the others. Or scatter 3-4 tiny cherries across the nail in a scattered pattern. You have options here.
Long Nails:
Long nails are your canvas for going big. Multiple cherries, detailed stems with leaves, adding backgrounds like gingham or florals—it’s all fair game.
One stunning look I’ve seen is a full cherry branch design spanning multiple nails when you hold your hand together. Advanced level stuff, but wow does it make a statement.
Comparing Cherry Nail Designs
| Design Style | Difficulty Level | Best For | Time Required | Longevity |
|---|---|---|---|---|
| Classic Cherry Dots | Beginner | Everyday wear | 20-30 mins | 5-7 days |
| 3D Cherry Art | Advanced | Special occasions | 1-2 hours | 10-14 days |
| Cherry Stickers | Beginner | Quick manicures | 15 mins | 3-5 days |
| Cherry French Tips | Intermediate | Professional settings | 30-45 mins | 7-10 days |
| Realistic Painted Cherries | Advanced | Showcasing nail art | 45-60 mins | 7-10 days |
| Chrome Cherry Combo | Intermediate | Evening events | 40-50 mins | 7-10 days |
Common Cherry Nail Mistakes (And How to Avoid Them)
Look, I’ve made all these mistakes so you don’t have to. Learn from my cherry-painted failures:
Mistake #1: Cherry Blobs
Your cherries look more like abstract blobs than fruit. This happens when you use too much polish on your dotting tool or don’t let layers dry between coats.
Fix: Use less polish than you think you need. Build up color with multiple thin layers rather than one thick one.
Mistake #2: Wonky Stems
Those stems are going everywhere except where they should. Your hand probably cramped up trying to draw straight lines.
Fix: Rest your hand on a flat surface while drawing stems. Or use striping tape as a guide. Also, slightly wobbly stems actually look more natural and hand-drawn. Perfection isn’t always the goal.
Mistake #3: Bleeding Colors
Your red cherries bled into your nude base, creating a pink mess. Classic problem.
Fix: Make sure your base coat is 100% dry before adding cherries. If using gel, cure it first. With regular polish, wait at least 10 minutes.
Mistake #4: Lost Details
You spent forever adding tiny highlights and details, then covered them up with thick top coat.
Fix: Use thin coats of top coat. Or try a no-wipe gel top coat that goes on clear and doesn’t disturb underlying designs.
Mistake #5: Lopsided Placement
All your cherries ended up in weird spots, making your nails look unbalanced.
Fix: Plan your design first. Use a toothpick to mark where cherries will go before committing to polish. Step back and look at all your nails together to check balance.
Making Your Cherry Manicure Last Longer
You spent time on these cute cherry nail ideas, so let’s make them last. Here’s what actually works:
Proper Prep is Everything
Clean, dry nails are crucial. Oil and moisture are your enemy here. Wipe nails with rubbing alcohol or nail prep solution before starting. This might seem extra, but it seriously extends wear time.
Don’t Skip the Base Coat
I know, I know—it feels like an unnecessary step when you’re excited to get to the fun part. But base coat prevents staining and helps polish stick better. It’s insurance for your manicure.
Thin Layers Are Your Friend
Multiple thin coats always outlast one thick coat. Always. Thick polish takes forever to dry and chips faster.
Cap Your Tips
When applying base coat, color, and top coat, swipe across the free edge of your nail. This “caps” the tip and prevents chipping. Bonus tip: reapply top coat every 2-3 days to refresh shine and protection.
Be Smart About Activities
The first few hours after painting are crucial. Avoid hot water, excessive hand washing, or activities that’ll bang up your nails. Give that polish time to fully cure.
Moisturize Your Cuticles
Dry cuticles lead to polish lifting at the edges. Use cuticle oil daily—it keeps the nail area healthy and your manicure looking fresh.
Cherry Nails for Different Occasions
Office-Appropriate Cherry Nails
Yes, you can absolutely rock cherry nail designs at work. The key is keeping them subtle. Single cherry accent on one nail, nude or French base everywhere else. Or go with super tiny cherries on just the ring finger. Professional doesn’t mean boring.
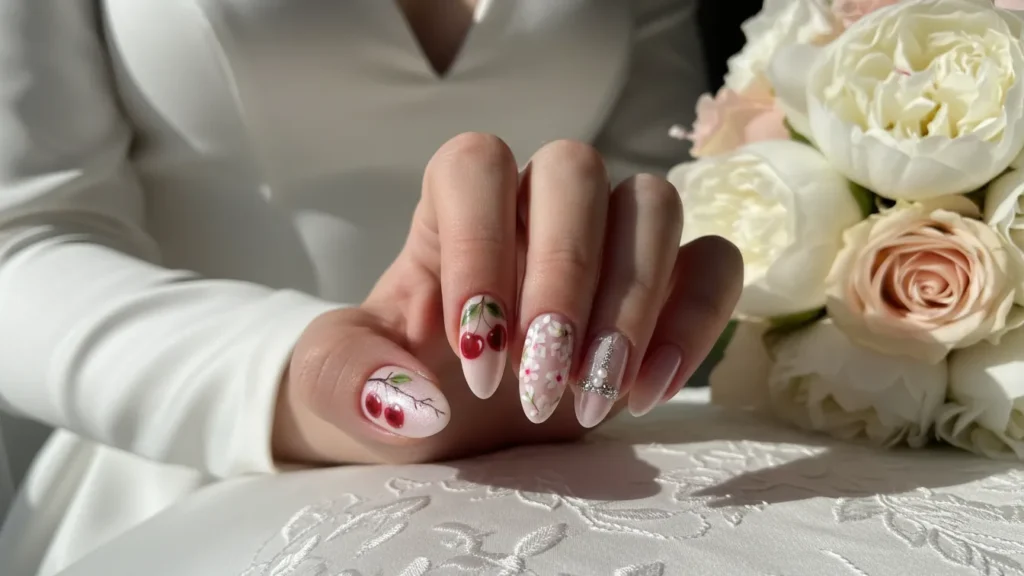
Wedding & Special Events
For formal occasions, think elegant. Soft pink base with delicate cherry details, maybe add some gold accents. Or try the reverse—deep burgundy cherries on a champagne chrome base for evening glamour.
Casual Weekend Vibes
This is when you can go wild. All-over cherry prints, bright colors, mix multiple patterns. Nobody’s judging your weekend nail art. Have fun with it.
Date Night Cherry Nails
Romantic and playful? Heart-shaped cherries on a soft pink base. Add some shimmer or subtle glitter. It’s flirty without trying too hard.
Cherry Nail Inspiration from Celebrities
Hailey Bieber basically launched this whole cherry nail craze into the mainstream. Her mint glazed cherry nails had everyone running to recreate the look. What made them special? The combo of trendy glazed finish with cute cherry art—best of both worlds.
Other celebrities have jumped on board too. You’ll spot cherry designs everywhere from red carpets to casual coffee runs. The trend has serious staying power because it’s adaptable to different style aesthetics.
Products That Actually Work for Cherry Nails
I’m not going to link a million products here, but let me tell you what types of products work best:
For Polish:
Look for highly pigmented reds that cover in one coat. For greens, you want something bright and opaque. Essie and OPI both make great options, but honestly, most drugstore brands work fine for nail art.
For Tools:
Those cheap dotting tool sets from Amazon? They work perfectly. Don’t overthink it. Same with nail art brushes—the super expensive ones aren’t necessarily better than mid-range options.
For Top Coats:
This is where spending a bit more matters. Seche Vite for quick-dry, or any good gel top coat if you’re working with gel polish. The finish makes or breaks your final look.
Frequently Missed Details in Cherry Nail Art
Here’s what takes cherry nail designs from good to great—the little things most tutorials skip:
Highlights Make Cherries Pop
That tiny white dot on each cherry? It mimics light reflection and makes them look dimensional. Don’t skip it. Use the finest brush you have or even a toothpick.
Leaves Add Authenticity
Real cherries have leaves. Adding even one tiny leaf near the stem makes the whole design more realistic and complete.
Vary Your Cherry Sizes
In nature, cherries aren’t identical. Making some slightly smaller or larger adds visual interest.
Background Matters
The base color you choose affects how your cherries read. Nude makes them pop and look elegant. White gives a crisp, clean vibe. Dark colors create dramatic contrast.
The Future of Cherry Nail Trends
Where’s this trend heading? Based on what I’m seeing, cherry nail ideas are evolving beyond the basic red-and-green combo.
We’re seeing more experimental color palettes—purple cherries, blue cherries, rainbow cherries. The cherry shape stays but the colors get wild. There’s also a move toward more abstract interpretations. Cherry-inspired patterns rather than literal fruit representations.
3D and textured cherry designs are getting more sophisticated too. Expect to see more mixed-media approaches combining gel, acrylic, and various embellishments.
The bottom line? Cherry nails aren’t going anywhere anytime soon. The trend has enough versatility to keep evolving and staying fresh.
Final Thoughts on Cherry Nail Ideas
Look, at the end of the day, cherry nail ideas are just plain fun. They’re not trying to be serious or minimalist or whatever nail trend dominated last season. They’re playful, cute, and make you smile when you look down at your hands.
What I love most is how accessible this trend is. You don’t need salon skills or expensive products. A couple of dotting tools and some polish, and you’re in business. Start simple, get comfortable, then experiment with more complex designs as you go.
The beauty of cherry nail art is that there’s no wrong way to do it. Cherries on every nail? Cool. One tiny cherry on your pinky? Also cool. The only rule is making yourself happy.
So grab your red polish and give it a try. Your fingertips will thank you. And who knows? You might just find your new signature nail look.
Now go forth and create some seriously cute cherry manicures. I’ll be over here planning my next design—thinking some leopard print mixed with cherries sounds pretty good right about now. 🍒